

Software-as-a-service (SaaS) subscription businesses are among the fastest-growing companies in the world today. Every day, developers and aspiring entrepreneurs break code on a new subscription SaaS product. But what do these apps look like under the hood?
This guide will cover all the technical details of creating a subscription SaaS business using the Python-based Django web framework and Stripe payment processor.
Here's an interactive demo of what we'll be building, which is part of SaaS Pegasus—the Django SaaS Starter Kit.
Contents
- Contents
- Who should read this
- What you'll need
- An overview of subscriptions
- Subscription data modeling
- Setting up your Stripe billing models
- Syncing your Stripe billing data to your Django application
- Working with Products and Prices
- Setting up your Subscription Data Models
- Choosing a Stripe integration model
- Hooking up Stripe Subscriptions into your Django application
- Allowing changes via the customer portal
- Keeping things in Sync with Webhooks
- Conclusion
- Changelog
By the time you've finished the article you should have solid foundational knowledge of everything needed to build a subscription SaaS application—and if you follow along—a fully-functional implementation of subscriptions in your own Django project.
Who should read this
This guide is written primarily for developers who want to add paid subscriptions to their application.
It is specifically focused on the Django web framework and Stripe subscriptions.
If you're a developer using a different technology stack you'll still benefit from the high-level modeling and architectural sections, but may struggle to follow along with some of the code examples, as we assume basic Python and Django knowledge. We also focus heavily on a Stripe integration—though much of the guide holds for Paypal, Paddle, Lemon Squeezy, or any other payment gateway.
What you'll need
In order to follow along you'll need:
- A basic Django project. The examples use Django 4.2 and Python 3.11.
- A free Stripe account. Test mode is fine.
An overview of subscriptions
Before getting into the details of the integration, we'll first take a moment to cover what subscriptions are and why you would want to use them.
If you're already familiar with subscriptions and convinced you want them, feel free to skim this section and/or skip ahead!
What are subscriptions?
Most businesses that sell software operate in one of two ways:
- Charge a single amount for a product or access to a service. This is also known as a one-time sale model. Historically, this was the most common way to sell software, and the model is still common in a lot of desktop software, mobile apps, and games.
- Charge a recurring amount on a recurring basis, typically each month or year. This is a subscription model—often also referred to as as a software as a service (SaaS) businesses. Spotify, Netflix, Salesforce, and Zoom are all subscription businesses.
There are other software business models—including advertising-based (e.g. Google, Facebook), or marketplace/transaction-fee based (e.g. AirBNB, Stripe)—but in this post we're focusing on the subscription model.
Why would you want to use subscriptions?
As loads of startup advice will tell you, subscription revenue is the holy grail of business models. Because, instead of collecting a one-time sale from your customers, or relying on consistent traffic for advertising, you collect predictable, recurring revenue from your customers.
Recurring revenue is the only way Jason Cohen, Founder, WP Engine, Designing the Ideal Bootstrapped Business
Having subscription revenue makes it easier to model and forecast your business, since you can quantitatively learn how many new customers you acquire in a month and how many will will cancel (a.k.a. churn). This allows you to very reliably understand how much money you can expect to earn next month, next quarter, and next year.
Subscriptions are also generally a way to increase a customer's life time value (LTV)—the amount of money the they pay you to use your product over time. By charging a smaller amount on a recurring basis you will typically, over the lifetime of a customer, be able to collect substantially more total revenue than from a single-time purchase.
Even software products that have historically had a very successful one-time-sale model like Adobe Photoshop have now switched to a subscription model.

How should you structure your subscriptions?
Ok, so you're convinced you want to offer subscriptions to your product. The next question you'll face, is how to set them up. There are a number of choices you'll have to make, including:
- How many different pricing tiers will the product have and what will the prices be?
- Will there be a free tier? What about a trial?
- What will be included in each tier? Common options include limiting access to certain features, as well as setting limits on usage—e.g. only allowing a certain number of users or events on a particular tier.
- What billing options will you offer? Most apps offer at least a monthly plan and a discounted annual plan.
- Will you offer a single pricing structure, or charge based on usage? For example, most email sending platforms charge based on the number of mails you send.
Unfortunately there is no one-size-fits-all answer to these questions. Most of the answers will be specific to the application that you are developing, and as the business owner you are hopefully more qualified than anyone else (certainly this article) to make those choices.
For the purposes of this post, we'll go with one of the most common options: a freemium application with multiple pricing tiers and monthly and annual billing options.
Subscription data modeling
Subscription billing systems are complicated.
They involve many moving parts, both on the setup side (what subscriptions you offer) and on the payment side (the details required to collect a payment from a customer and sign them up to a plan).
On the setup side you need to model what tiers exist, how they map to different features in your application, and how much they cost for various time intervals (e.g. monthly, annual, etc.).
And on the payment side you need to model the individual payment details as well as information about the customer and subscription, including the plan they are on, payment status, and renewal details.
It's a lot of stuff!
Thankfully Stripe has thought this problem through for us and created Stripe billing to model everything we'll need. Therefore, we'll largely be relying on Stripe's billing models and just annotating and referencing them a bit in our Django application. This drastically simplifies the amount of modeling we have to do on our own.
It also means that by and large Stripe will be the primary source of truth for most information, and our Django application will (mostly) just grab a read-only copy of whatever it needs from Stripe.
The Stripe Billing models we'll be using
Stripe's payment and billing system is large and complex, but for the most part we'll be able to focus on four key models—two on the setup side and two on the payment side.
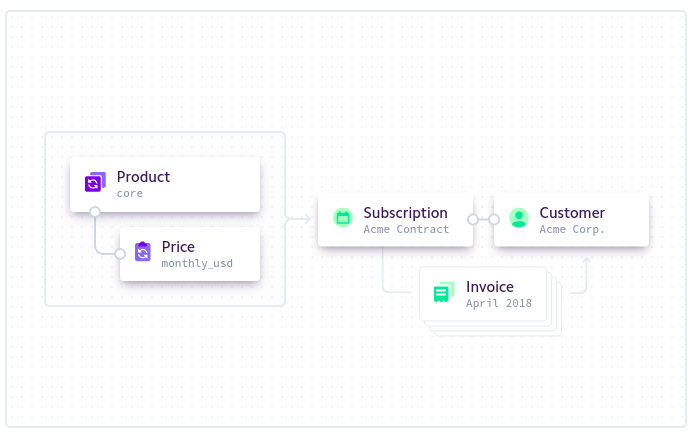
In setup we'll primarily be using Products and Prices.
From Stripe's documentation:
Products and prices are core resources for many Stripe integrations. Products define what your business offers, whether that’s goods or services. Prices define how much and how often to charge for products.
Each product typically has one or more associated prices.
In the SaaS world (and in the rest of this example) products are the primary model that map to your pricing tiers—e.g. "Pro" and "Enterprise", and prices are the options users have for signing up for those products, e.g. "Monthly", "Annual", or "Student Rate".
SaaS applications often refer to the things that Stripe calls "products" as "plans" or "tiers". This guide uses product when referring specifically to the Stripe model, and uses plans and tiers when referring to the general concept.
For payment-processing we'll focus on Subscriptions and Customers.
The main model we'll be referencing is the subscription—which will allow you to charge a customer on a recurring basis. However, creating subscriptions and collecting payments requires working with customers, so we'll cover those too.
Modeling and syncing data between your application and Stripe
At a high level we're going to keep our products, prices, subscriptions and customers in Stripe. But we still need to be able to reference them in our own application so we can do things like:
- Show a pricing page with our different pricing tiers on it
- Determine whether a user has an active subscription so they can access a particular feature
- Send invoices or payment reminders to our customers
So how will we link them up?
As we mentioned above, we consider Stripe the primary copy of our data and treat our application as a read-only replica.
What does that look like, practically?
There are two possible approaches.
Approach 1: Store the Stripe IDs of the various objects we'll be using.
In this approach, all we ever store is the Stripe ID of the object in question. Then, whenever we need more information about that object—say to find out the amount of a particular price—we'd query the Stripe API with the appropriate ID and get back the information we need.
class MyStripeModel(models.Model):
    name = models.CharField(max_length=100)
    stripe_subscription_id = models.CharField(max_length=100)
This keeps things quite simple on our side—we don't need to maintain any local state or worry about keeping data in sync apart from the IDs. Any time we need data, we get it from Stripe and we are guaranteed that the information is up-to-date.
The main problem with this approach is performance. Remote requests are expensive—and so if you're trying to keep your page load times down, minimizing the number of external API calls your application makes can be important. Performance issues can be mitigated with caching, but this isn't always an easy option.
Approach 2: Keep a copy of the Stripe models in your local application database.
In this approach we use code that keeps our Stripe data in sync with our local application database. Then, rather than going back to Stripe every time we need information about a particular piece of data, we can just look it up in our application DB. This solves the performance issue above, and makes it much easier to work with Stripe data—we can just use the ORM we use for the rest of our data.
class StripeSubscription(models.Model):
    start_date = models.DateTimeField(help_text="The start date of the subscription.")
    status = models.CharField(max_length=20, help_text="The status of this subscription.")
    # other data we need about the Subscription from Stripe goes here


class MyStripeModel(models.Model):
    name = models.CharField(max_length=100)
    stripe_subscription = models.ForeignKey(StripeSubscription, on_delete=models.SET_NULL)
The problem with this approach is that, data synchronization is hard.
If we're not careful, our local copy of the data can get out of sync with Stripe, and then bad things can happen to our users. Imagine if someone signed up for a $10/month plan and then got billed $20 for the first month because our data was out of sync! They'd probably be pretty upset.
So, which approach is better?
For simple setups it's probably better to go with Approach 1 and only store Stripe IDs. This can get you pretty far and you can always change plans if performance becomes a problem or you encounter workflows that require having more data in your application.
However, specifically for Django applications, we recommend Approach 2. This is primarily because of the great dj-stripe library that handles keeping our data in sync with Stripe with very little effort, allows us to reap the performance benefit of having the data locally, and lets us interface with our Stripe data through the ORM.
If dj-stripe didn't exist, we'd recommend Approach 1 for getting off the ground,
but since it does, we'll go with Approach 2 and use it throughout the rest of this guide.
Setting up your Stripe billing models
Ok with our big-picture modeling out of the way we can finally start getting our hands dirty.
The first thing we're going to do is set up our Products and Prices in Stripe. You may want to follow Stripe's guide to setting up a Subscription as we get started. We'll reference this page throughout this section.
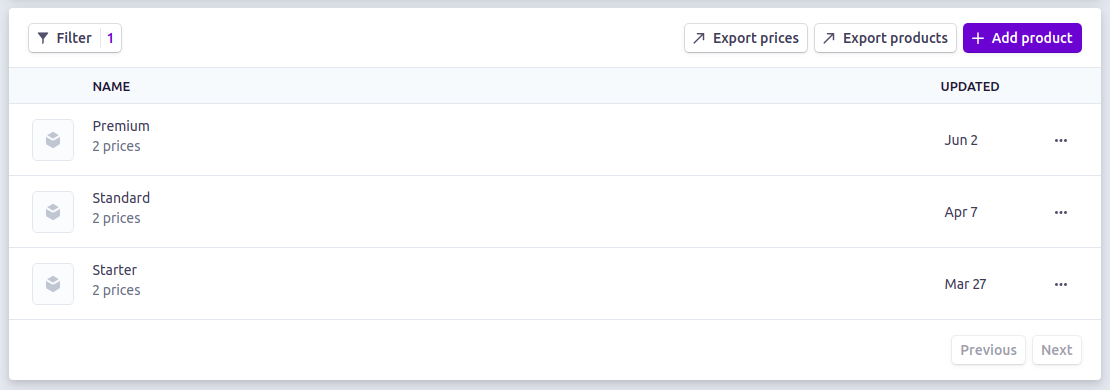
This guide will use a relatively generic set of subscription options: three products named "Starter", "Standard", and "Premium", with two prices each ("Monthly" and "Annual").
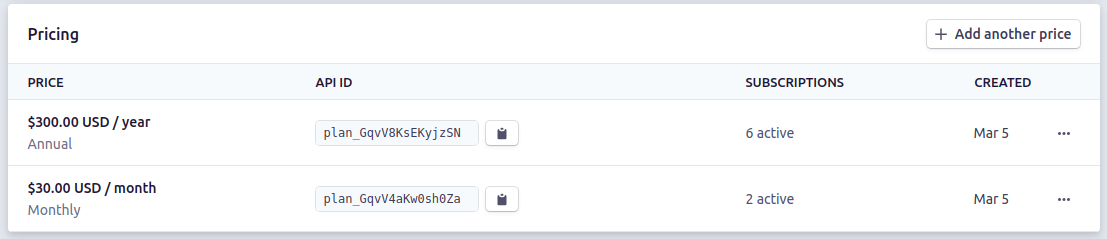
So, starting with Steps 1 and 2 in the guide, go ahead and create three Products with the names above (or use your own if you prefer). For each Product, add two Prices—one billed monthly and one billed annually. Set your prices up however you like. In our example, we've made the Annual plan cost 10x the monthly (so you get two months free by opting for annual billing—a common SaaS pricing model).
You can use the CLI or the Stripe dashboard to do this.
When you're done your Product list should look something like this:
And in each Product the list of Prices should look something like this:
Done? Great!
Let's get coding!
Syncing your Stripe billing data to your Django application
Now that your data is in Stripe it's time to sync it to your Django application.
Remember that library dj-stripe that we mentioned above? This is where it starts to come in handy.
Setting up and configuring dj-stripe
First we'll need to setup dj-stripe.
Follow the instructions on their installation documentation,
by running pip install dj-stripe, poetry install dj-stripe, or adding it to your project's requirements file.
Then add the "djstripe" app to your INSTALLED_APPS in settings.py like below:
INSTALLED_APPS =(
    # other apps here
    "djstripe",
)
You will also need to add your API keys. dj-stripe recommends doing this in the Django admin,
though you can also do it in your settings.py (which is what we do below).
You can read more about how dj-stripe manages API keys here.
We'll be using test mode, so make sure at least the variables/keys below are set. You can your keys from this page.
In settings.py add these lines:
STRIPE_TEST_PUBLIC_KEY = os.environ.get("STRIPE_TEST_PUBLIC_KEY", "<your publishable key>")
STRIPE_TEST_SECRET_KEY = os.environ.get("STRIPE_TEST_SECRET_KEY", "<your secret key>")
STRIPE_LIVE_MODE = False
# Needed for webhooks, which are discussed later in the guide.
DJSTRIPE_WEBHOOK_SECRET = os.environ.get("DJSTRIPE_WEBHOOK_SECRET", "whsec_xxx")
This example allows you to use os environment variables so you don't have to store your secrets in a .py file.
However, if you're not familiar with environment variables and are setting things up locally with your test account
it's fine to add the keys directly where it says "<your key>".
Once you've added your keys, you will need to create the dj-stripe database tables:
./manage.py migrate
If this command fails it's likely that something isn't set up properly (the command should provide more details). If that happens, double-check your setup and make sure it's working before continuing on.
Bootstrapping your initial Products and Prices in Django
With dj-stripe set up, syncing our Products and Prices is now trivial.
Just run the following built-in command:
python manage.py djstripe_sync_models price
If everything is setup properly you should see output that looks like this:
Syncing Price for key sk_test_....:
  id=price_1O2B0IFXweiLmWO7S3RqNVwZ, pk=1 ($1,000.00 USD/year for Premium on acct_1E5YpwFXweiLmWO7 for sk_test_...)
  id=price_1O2AxcFXweiLmWO7PDHhGdJI, pk=2 ($100.00 USD/month for Premium on acct_1E5YpwFXweiLmWO7 for sk_test_...)
  id=price_1O2AwJFXweiLmWO7ETWUWPEC, pk=3 ($300.00 USD/year for Standard on acct_1E5YpwFXweiLmWO7 for sk_test_...)
  id=price_1O2AuUFXweiLmWO7F7kC7Nn0, pk=4 ($30.00 USD/month for Standard on acct_1E5YpwFXweiLmWO7 for sk_test_...)
  id=price_1Nmur2FXweiLmWO7ZlldWUy8, pk=5 ($100.00 USD/year for Starter on acct_1E5YpwFXweiLmWO7 for sk_test_...)
  id=price_1NmumMFXweiLmWO7ef0SBEkA, pk=6 ($10.00 USD/month for Starter on acct_1E5YpwFXweiLmWO7 for sk_test_...)
Synced 6 Price for sk_test_....
You should see one line per pricing plan you set up (6 total if you used the suggested setup above).
What just happened?
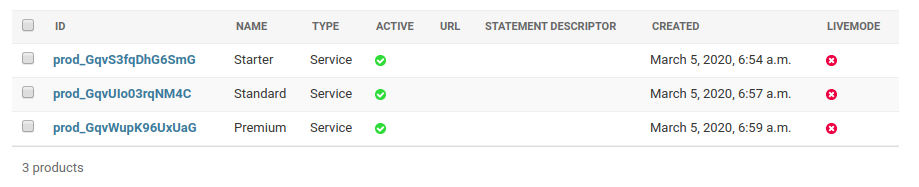
Behind the scenes dj-stripe looked into your Stripe account, found all your Products and Prices and synced them to your local database.
If you go to your local Django Admin UI (by default at http://localhost:8000/admin/djstripe/product/)
you should now see the Stripe products you set up earlier.
Why was this useful?
Well, now that we have the data in our database we can start using it in our Django application! Let's do that next.
Working with Products and Prices
To get started we're going to run through a few examples using just products and prices. Once that's out of the way we'll move on to subscriptions.
Creating a Pricing Page
Since the original publication of this guide, Stripe has released an embeddable pricing table, which can be integrated into a Django project in just a few lines of code. This is the recommended option for adding a pricing page to most projects, and we'll walk through the details of setting it up later in the guide.
That said, the below discussion still serves as a useful example of working with Stripe product and price data in your application.
The first thing we might want to do is create a pricing page. This is where our potential customers can see our different tiers, how much they cost, and what's in them. It's also the place where—eventually—they'll be able to subscribe to a plan.
Let's start by setting up the UI.
Since all our data is now synchronized from Stripe, we won't have to go back to Stripe to get the data but
can just inspect our local dj-stripe models.
At a very basic level, that might look something like the below.
1. Set up a URL route
In urls.py:
from django.urls import path

from . import views

urlpatterns = [
    path("pricing-page/", views.pricing_page, name="pricing_page"),
]
2. Create the View
In views.py:
from django.shortcuts import render
from djstripe.models import Product

def pricing_page(request):
    return render(request, 'pricing_page.html', {
        'products': Product.objects.all()
    })
Notice how we are just grabbing the products from our database using the ORM instead of hitting the Stripe API. We can do this because we have synced our Stripe data to our application DB.
3. Create the Template
In pricing_page.html:
<section>
  <p class="title">Pricing Plans</p>
  <div class="columns">
    {% for product in products %}
      <div class="column">
        <p class="subtitle">{{ product.name }}</p>
        {% for plan in product.plan_set.all %}
          <div>
            <p class="heading">{{ plan.nickname }}</p>
            <p>{{ plan.human_readable_price }}</p>
          </div>
        {% endfor %}
      </div>
    {% endfor %}
  </div>
</section>
If you've set things up properly this should render a page that looks something like the below (you'll need to have Bulma CSS on the page for the styling to work).
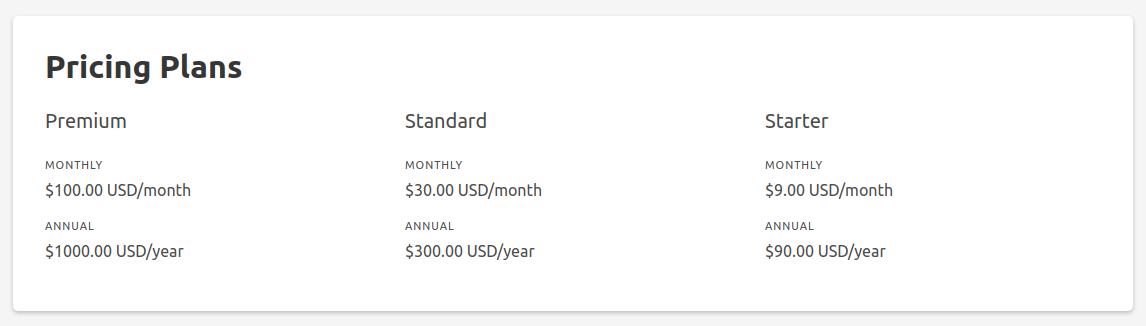
Not bad for a few lines of code!
But—we probably want to display a bunch more stuff than just the names and prices.
A real SaaS pricing page might look more like this.
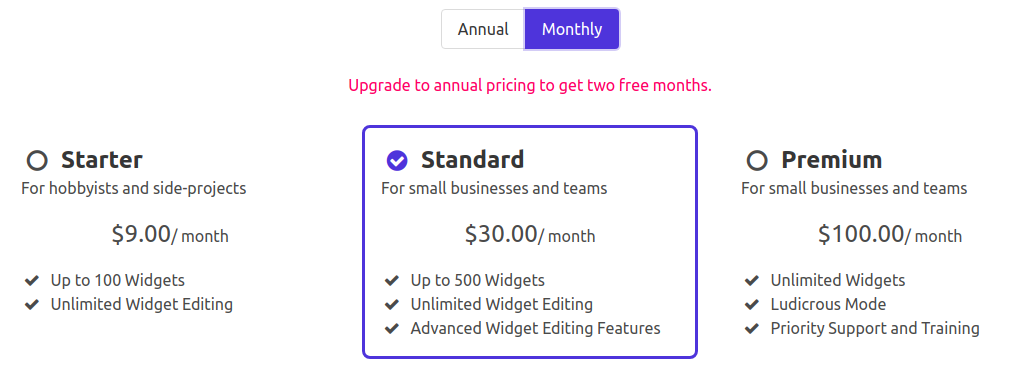
Here we've added three pieces of information to each tier:
- A description/tagline saying more about the tier and who it's for.
- A list of features that are available.
- Whether the tier is the default—which is highlighted in the UI.
To make this page we're going to need to create some additional metadata around the products and prices.
Adding metadata to your Stripe objects
Ok, so we want to attach the above information to our pricing tiers.
How should we do that?
Once again, we are faced with several options:
- We could store this information in Stripe. Stripe has fields for some of these options, and allows arbitrary "metadata" to be attached to objects, so we could store it there, sync it to our database, and then display it, similar to the other pieces of information.
- We could store the information in our application database. Since all of this data is application-specific there's not really a need for it to be in Stripe. So we could just create a local Database model to store it. Then we don't have to use Stripe's clunky metadata UI or worry about sync issues. This seems more appealing.
- We could store the information in code. If this data is coupled with our application anyways, we could bypass the database entirely and just keep it in our source code. This simplifies things even more—though comes with the downside of requiring code changes to make changes.
This guide recommends the following algorithm for where to put data: If the field is available natively in Stripe, use that. If not, add in your application code.
Some fields, like the description/tagline can be added directly in the Stripe dashboard. If that's the case, put it there. It's always nice to only have things in a single place, and remember, Stripe is the default source of truth for our billing data. Plus, keeping this information in Stripe will make things easier when we use Stripe's no-code tools like the Checkout Page and Embedded Pricing Table, which we'll see later.
As for things that aren't available natively in Stripe—we have the choice of Stripe "metadata", our application database, and our application code. So why pick code? The main reason is that your Django application code is ultimately going to be coupled with this data in some way, so you might as well take it all that way.
This is a bit confusing, so let's use an example. In the second pricing page above there's a feature called "Ludicrous Mode" that should only be available on a Premium subscription.
One thing we needed to do is show "Ludicrous Mode" on the pricing page. That could be done easily with all three options above.
But, we also want to have logic that only allows our users to enter Ludicrous Mode if they are subscribed to the right plan.
Unless the entire permission matrix of your application lives in a database (and good luck with that if it does)—you'll end up with code like the following:
if ludicrous_mode_enabled(user):
    do_ludicrous_stuff()
So invariably your code will be coupled with your pricing tiers, anyway. Therefore, might as well commit to maintaining this logic in code and then at least there's fewer ways for your code and data to get out of sync.

Keeping this logic in your code also makes it easier to keep your different environments in sync, write automated tests for feature-gating logic, and roll-out (and rollback) changes to production.
There cons of this setup—the largest being that it require developers and a deploy to production to make any changes—but by and large it's the simplest and easiest to maintain for small-to-medium sized applications and teams.
So we're going to add some code to augment our Stripe Product data. Here's what that might look like:
First we'll define our features as constants in a file called features.py:
UNLIMITED_WIDGETS = 'Unlimited Widgets'
LUDICROUS_MODE = 'Ludicrous Mode'
PRIORITY_SUPPORT = 'Priority Support'
This step is optional—we could just use hard-coded strings—but having them as constants is a best-practice that allows us to easily reference them across our code without worrying about typos, etc. In this example the feature constants are just display names, but you could add arbitrary structure to them as well, similar to how we plan to attach these to our Stripe products.
So how does that work? We can attach these in a file called metadata.py:
@dataclass
class ProductMetadata(object):
    """
    Metadata for a Stripe product.
    """
    stripe_id: str
    name: str
    features: List[str]
    description: str = ''
    is_default: bool = False


PREMIUM = ProductMetadata(
    stripe_id='prod_GqvWupK96UxUaG',
    name='Premium',
    description='For small businesses and teams',
    is_default=False,
    features=[
        features.UNLIMITED_WIDGETS,
        features.LUDICROUS_MODE,
        features.PRIORITY_SUPPORT,
    ],
)
# other products go here
In the above example, we've created a metadata class to associate with a Stripe product and manually linked it by stripe_id.
We've added attributes for our description, list of features and (and any other information we want) entirely in code,
which allows us to more easily test, version control, and roll out changes that are specific to our application.
Now that we have this structure, we can easily write code like this to turn on/off particular features in our application.
Returning to our example above we can implement the ludicrous_mode_enabled function:
def ludicrous_mode_enabled(user):
    return features.LUDICROUS_MODE in user.product.metadata.features
This keeps the management of our subscriptions and features in one place.
We can also use this metadata structure to build out our new pricing page.
Here's a sketch of the unstyled HTML for that page, assuming that each of your stripe products has a .metadata property
referencing the class above.
<div class="plan-interval-selector">
  {% for plan in plans %}
    <button class="button">{{ plan.name }}</button>
  {% endfor %}
</div>
<div class="columns plan-selector">
{% for product in products %}
  <div class="column">
    <div {% if product.metadata.is_default %}class="is-selected"{% endif %}>
      <span class="icon">
        <i class="fa {% if product.metadata.is_default %}fa-check{% else %}fa-circle{% endif %}">
        </i>
      </span>
      <p class="plan-name">{{ product.metadata.name }}</p>
      <p class="plan-description">{{ product.metadata.description }}</p>
      <div class="plan-price">
        <span class="price">{{ product.metadata.monthly_price }}</span> / month
      </div>
      <ul class="features">
         {% for feature in product.metadata.features %}
         <li>
           <span class="icon"><i class="fa fa-check"></i></span>
           <span class="feature">{{ feature }}</span>
         </li>
         {% endfor %}
      </ul>
    </div>
  </div>
{% endfor %}
</div>
ProductMetadata class attached to Stripe data.
This exercise of styling the HTML and making it interactive is left up to the reader.
Setting up your Subscription Data Models
Phew! Ok, now we've got our Stripe product and price data synchronized with our application and we are using the data—along with some additional metadata—to generate our grid of pricing tiers. It's a good start, but we still haven't done anything to allow our users to purchase and use our products. So let's get into that.
The first thing we'll want to do is set up the data models.
And like the products and prices, we'll follow the same basic principle of making Stripe the source of truth,
and then mapping the Stripe data to our application models.
Once again we'll take advantage of dj-stripe to handle a lot of the data synchronization.
The basic plan will be:
- A user goes through the subscription workflow on our site
- We create a subscription object in Stripe
- We sync that subscription to our application database
- Finally, we attach the subscription to our local data models (i.e. the logged-in acccount)
We'll cover these steps in depth when we go over creating your first subscription, but first we're going to discuss data modeling.
Choosing how to model Subscriptions in your Django application
As we mentioned above, we'll be focusing on the subscription and customer Stripe objects.
So let's assume we already have these objects synchronized to our database. How do these fit in to our application?
Since we have the models synchronized to our local database via dj-stripe, the answer is likely some kind of
ForeignKey to our other data models. But which ones?
The choice of where to link these will often be application-specific, though there are a few common use-cases we can cover.
A user-based SaaS (typically B2C)
In a user-based SaaS each person has their own account and manages their own subscription. This is the most common model for business-to-consumer (B2C) apps like Spotify or Netflix (ignoring family plans).
For user-based SaaS applications the answer is likely that the Django User model is the right place to associate
your subscription and customer details.
Assuming you have overridden the User model (which is highly recommended), that would look something like this:
class CustomUser(AbstractUser):
    subscription = models.ForeignKey(
        'djstripe.Subscription', null=True, blank=True, on_delete=models.SET_NULL,
        help_text="The user's Stripe Subscription object, if it exists"
    )
    customer = models.ForeignKey(
        'djstripe.Customer', null=True, blank=True, on_delete=models.SET_NULL,
        help_text="The user's Stripe Customer object, if it exists"
    )
CustomUser model, for a typical B2C SaaS application
Now in our application we can check against the subscription—for example to see if ludicrous mode is enabled,
by referencing it directly off the CustomUser model:
def ludicrous_mode_enabled(user: CustomUser) -> bool:
    return features.LUDICROUS_MODE in user.subscription.product.metadata.features
And we'd call it directly with request.user in a view:
if ludicrous_mode_enabled(request.user):
    # do ludicrous stuff
A team-based, multi-tenant SaaS (typically B2B)
Most SaaS applications are actually not consumer-facing, but instead target other businesses. For a business-to-business (B2B) SaaS it's more likely that you'll have the concept of "Teams" or "Organizations" that contain multiple users—typically mapping to a company or division of a company.
In this case you likely want to associate the subscription and customer with the Team model (or whatever you've named it), because that's the unit that the tier "belongs to".
That might look like this:
class Team(models.Model):
    """
    A Team, with members.
    """
    team_name = models.CharField(max_length=100)
    members = models.ManyToManyField(
        settings.AUTH_USER_MODEL, related_name='teams', through='Membership'
    )
    subscription = models.ForeignKey(
        'djstripe.Subscription', null=True, blank=True, on_delete=models.SET_NULL,
        help_text="The team's Stripe Subscription object, if it exists"
    )
    customer = models.ForeignKey(
        'djstripe.Customer', null=True, blank=True, on_delete=models.SET_NULL,
        help_text="The user's Stripe Customer object, if it exists"
    )
Team model, for a typical B2B SaaS.
In this case all members of the team would have their subscription associated through the Team.
In this scenario, our application code would largely work with Teams:
def ludicrous_mode_enabled(team: Team) -> bool:
    return features.LUDICROUS_MODE in team.subscription.product.metadata.features
And we'd have to call it with the user's team a view:
if ludicrous_mode_enabled(request.user.team):
    # do ludicrous stuff
Shouldn't the customer be associated with a user?
Older versions of the guide recommended associating the Stripe customer object with a user, or a user's membership of a team instead of the team itself. This makes some sense, because it's typically a person with a credit card who is the one signing up for a subscription. However, in practice, organizations often have shifting personnel, and many different people may need access to the billing information at different times. Thus, we recommend handling that access via team-specific permissions, and keeping the customer association on the team itself, which allows for more flexible use-cases.
The above examples are only suggestions. Ultimately, how you set this up is up to the details of your own application's data models, Also, this guide recommends starting with the simplest model that works, and only expanding it when needed. You know, YAGNI and all.
For the rest of this example we'll use the B2C use case where the subscription and the customer are both attached to our custom Django User model.
Choosing a Stripe integration model
Now that we've figured out how to model our data we can finally wire everything up. Time to finally get paid!
Integrating subscriptions into your Django application used to take a ton of custom code, but Stripe has consistently shipped no-code tools to make the process easier. Before we get into any coding details we first have to choose how we'll do the integration, and which of their no-code tools we'll use.
The options in this section are covered in order from easiest to most complicated.
The embeddable pricing table
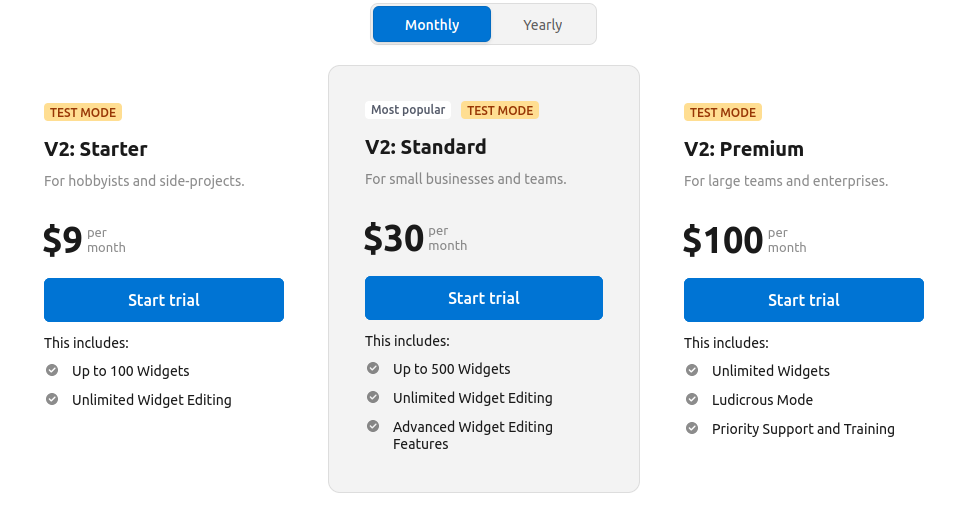
The Stripe embeddable pricing table (seen above) is by far the easiest option. You set up your billing model in Stripe, add a few lines of code to your application, and you're done! Stripe provides a custom pricing page component that can be embedded on your website, and uses a hosted Stripe checkout page (see below) for the payment experience.
This is the best option to pick as long as your use case supports it, as it requires very little of your own code and Stripe provides great out-of-the-box support and customization options.
Advantages
- Easiest to integrate.
- Stripe handles the display of your pricing page for you.
- Stripe handles all the payment/checkout complexity for you.
Disadvantages
- Limited customization of look and feel of pricing page.
- Limited customization of look and feel of checkout experience.
- Does not support all billing models—especially per-unit billing.
Stripe checkout
Next up in complexity is Stripe checkout. In this model, you manage the user experience of displaying your plans on your website (similar to what we went through above), but Stripe handles the payment experience via a hosted—or embedded—checkout page.
This is a more customizable option than the embedded pricing table, but will require you writing and maintaining more of your own code. It's only recommended if you have strict user experience requirements, or if your billing model isn't supported by the pricing table.
Advantages
- Relatively easy to integrate.
- Stripe handles all the payment/checkout complexity for you.
- You can completely customize your pricing page.
- Supports arbitrary billing models.
Disadvantages
- More code to manage for the pricing page, compared to the embedded pricing table.
- Limited customization of look and feel of checkout experience, compared to Stripe elements.
Stripe elements
Finally, the most complex integration involves Stripe elements. In this model, you handle everything directly on your site using Stripe components. You can use elements to get pixel-perfect UIs, but it comes at the cost of managing a whole lot of complex and brittle integration code in your app.
Advantages
- Full control over the exact look and feel of the entire payment experience, directly on your site.
- Supports arbitrary billing models.
Disadvantages
- Lots of complex, custom application code to manage.
Overall we recommend elements as a last resort—to be used only if your project absolutely needs it.
Summary
The following table summarizes the different options.
| Embeddable pricing table | Stripe checkout | Stripe elements | |
|---|---|---|---|
| Description | Display a pricing table on your website and take customers directly to Stripe Checkout. | Accept payments via an embedded or Stripe-hosted page | Use Stripe’s UI building blocks to handle payments directly on your site. |
| Pricing Page Managed By | Stripe | Stripe | You |
| Checkout Page Managed By | Stripe | You | You |
| Ease of set up | Very Easy | Moderate | Difficult |
| Code to maintain | Very little | Some | Lots |
| Customizability | Minimal (colors and branding) | Moderate (pricing page) | Fully customizable |
| Limitations | Certain billing models unsupported | - | - |
As mentioned already, this guide recommends using the embeddable pricing table unless it doesn't support your billing model. At the end of the day, Stripe provides a great checkout experience for your customers, and offloading the maximum amount of work to Stripe means more time for you and your dev team to improve your product.
What about Payment Links?
Payment links are another way to integrate Stripe. They allow you to create a shareable link that people can use to pay you without you even needing a website.
While they are useful for many cases, they aren't discussed here since they make less sense for Django app which already likely has a full site with user logins, a dashboard, and so on.
The next step of this guide will walk through the creating your first subscription using the Stripe embeddable pricing table.
Hooking up Stripe Subscriptions into your Django application
Since we're using Stripe's embeddable pricing table, most of the work will be handled for us by Stripe. In this section we'll show how specifically how you can follow Stripe's setup guide for a Django application.
The steps in this section correspond to the sections of that guide.
Create pricing table
First you will need a pricing table. Stripe provides complete instructions on this step, so follow those and come back when you're done.
Embed pricing table
Next, we'll embed the pricing table in our Django application.
The first thing we'll do is store the pricing table ID in our settings.py file:
STRIPE_PRICING_TABLE_ID = "prctbl_1Nkn4YACsyNNXfUPmD4Nw2kL"
This will allow us to keep this ID in a single place, and let us use different tables in dev and production.
Next we'll create the view. We can re-use the URLs and views that we created above (copied and slightly modified below).
In urls.py:
from django.urls import path

from . import views

urlpatterns = [
    path("pricing-page/", views.pricing_page, name="pricing_page"),
]
In views.py:
from django.conf import settings
from django.contrib.auth.decorators import login_required
from django.shortcuts import render
from djstripe.settings import djstripe_settings


@login_required
def pricing_page(request):
    return render(request, 'pricing_page.html', {
        'stripe_public_key': djstripe_settings.STRIPE_PUBLIC_KEY
        'stripe_pricing_table_id': settings.STRIPE_PRICING_TABLE_ID,
    })
This time we don't need to worry about passing any products to the template, since that is configured in Stripe. All we need to provide is our publishable Stripe key and pricing table ID from our settings files.
Finally, we need to add the Stripe javascript and pricing table to the template file.
We can do this as follows in pricing_page.html:
<script async src="https://js.stripe.com/v3/pricing-table.js"></script>
<stripe-pricing-table
 pricing-table-id="{{ stripe_pricing_table_id }}"
 publishable-key="{{ stripe_public_key }}"
>
</stripe-pricing-table>
...and that's it!
Our pricing table will be embedded in our Django application and we can start collecting subscription payments.
Track Subscriptions
Alright, we've gotten people to pay for subscriptions and they're showing up in Stripe. But we haven't actually done any integration with our application yet. So let's tackle that now.
Linking the logged-in user
The first step will be to link the logged-in user to the subscription object in Stripe.
We can do this using the client-reference-id field on the pricing table.
Here's the updated pricing table code with that added:
<stripe-pricing-table
 pricing-table-id="{{ stripe_pricing_table_id }}"
 publishable-key="{{ stripe_public_key }}"
 client-reference-id="{{ request.user.id }}"
>
</stripe-pricing-table>
Now our created subscriptions in Stripe will have a client_reference_id field with the ID of the user who signed up.
This will be useful in the next step.
Provisioning the subscription in our application
The Stripe guide recommends using webhooks to handle provisioning the subscription, and we'll cover that next. However, a simpler and often-more-user-friendly option is to provision then directly in the callback from the checkout page. The user will make the payment, then Stripe calls back to our site with a unique URL for that session, and we provision the subscription immediately.
This has the advantage of happening real-time in the user's browser session, avoiding any complex race-conditions that can come up with the webhook-based approach.
Here's how to set it up.
Configuring your callback URLs
First, we'll update our pricing table checkout to call back to our server instead of displaying a generic confirmation page. To do this, we can edit our pricing table, and under "Payment settings" change the confirmation page setting to "Don't show confirmation page (Redirect customers to your website.)"
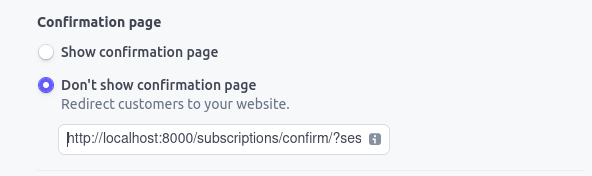
In the URL box we'll then put the following address for our development environment.
In production, we'd replace localhost with the url of our site:
http://localhost:8000/subscription-confirm/?session_id={CHECKOUT_SESSION_ID}
You will have to repeat this step for every product and price on your pricing page.
Creating our custom confirmation page
Now we need to create a view to process subscriptions in this page. We can start by adding the url declaration.
In urls.py:
from django.urls import path

from . import views

urlpatterns = [
    path("pricing-page/", views.pricing_page, name="pricing_page"),
    # add this line
    path("subscription-confirm/", views.subscription_confirm, name="subscription_confirm"),
]
Next we'll add the view that actually provisions the subscription. There are a few pieces to this step, but the high-level process will be:
- Get the data from Stripe
- Sync it with
dj-stripe - Save it to our own data models
- Display feedback to the user
Here's how that looks in code:
from django.contrib import messages
from django.http import HttpResponseRedirect
from django.contrib.auth import get_user_model
from django.contrib.auth.decorators import login_required
from django.urls import reverse

from djstripe.settings import djstripe_settings
from djstripe.models import Subscription

import stripe

@login_required
def subscription_confirm(request):
    # set our stripe keys up
    stripe.api_key = djstripe_settings.STRIPE_SECRET_KEY

    # get the session id from the URL and retrieve the session object from Stripe
    session_id = request.GET.get("session_id")
    session = stripe.checkout.Session.retrieve(session_id)

    # get the subscribing user from the client_reference_id we passed in above
    client_reference_id = int(session.client_reference_id)
    subscription_holder = get_user_model().objects.get(id=client_reference_id)
    # sanity check that the logged in user is the one being updated
    assert subscription_holder == request.user

    # get the subscription object form Stripe and sync to djstripe
    subscription = stripe.Subscription.retrieve(session.subscription)
    djstripe_subscription = Subscription.sync_from_stripe_data(subscription)

    # set the subscription and customer on our user
    subscription_holder.subscription = djstripe_subscription
    subscription_holder.customer = djstripe_subscription.customer
    subscription_holder.save()

    # show a message to the user and redirect
    messages.success(request, f"You've successfully signed up. Thanks for the support!")
    return HttpResponseRedirect(reverse("subscription_details"))
Now Stripe will call back to this view after the checkout page, and our Subscriptions will be provisioned and attached to the right user. We are done collecting our first subscription!
What about other integration models?
If you don't want to use the embeddable pricing table you can still use most of the above code successfully. In fact, everything that happens in this section (subscription provisioning) is exactly the same if you use Stripe checkout. The main difference is in creating the checkout Session, which requires a bit of backend code.
A previous version of this guide included an in-depth guide to setting everything up with Stripe elements, but that has been removed since it kept getting out of date. If you'd like to integrate Stripe elements, it's recommended to follow Stripe's guide, and use the principles in this guide to handle the Django pieces.
Now that we've successfully provisioned our subscriptions, we'll shift gears into managing them, including allowing customers to make changes to their subscriptions and keeping things in sync with webhooks.
If you're feeling tired, now might be a good time to mention that if you don't feel like implementing all of this yourself, you can always use SaaS Pegasus for a fully-featured, battle-tested, solution to integrating Stripe with Django.
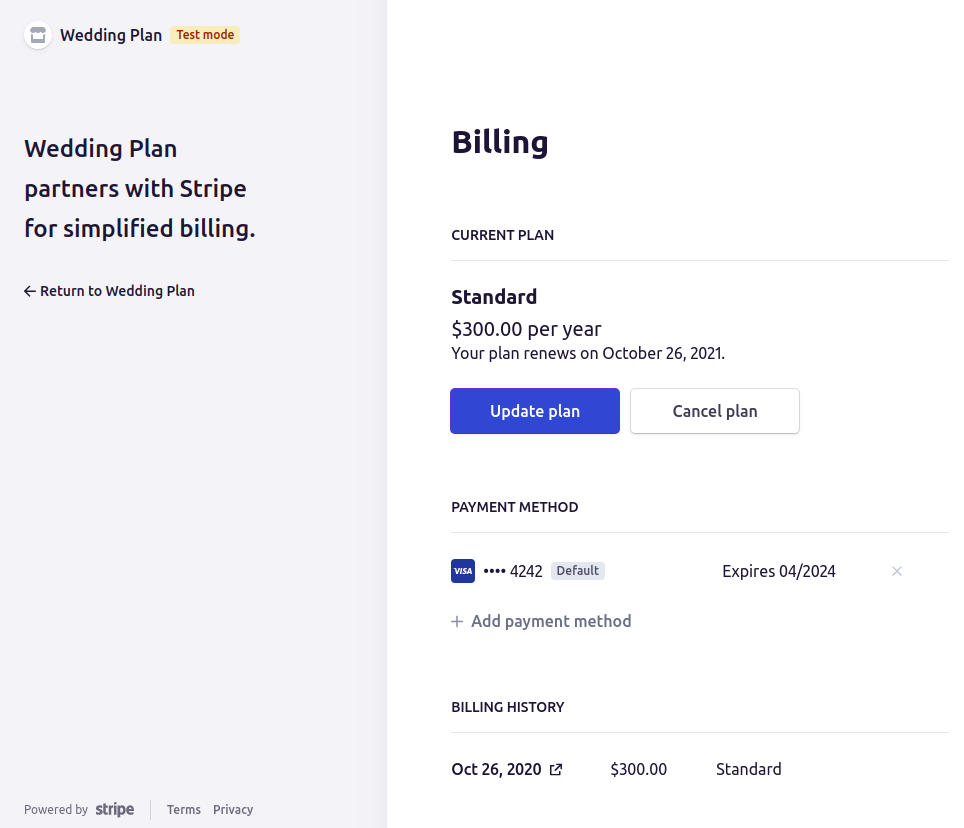
Allowing changes via the customer portal
Ok, we've successfully gotten people to purchase subscriptions on our site! Now what?
Well, one immediate challenge is that subscriptions, by nature, are recurring. Your customers are charged every month (assuming monthly billing), and they might want to cancel or change their plan, update their credit card information, and so on.
It is possible to code all of this logic into your app, but the far better option is to use Stripe's customer portal, and offload everything to Stripe.
Integrating the portal into your site can be as easy as sharing a link or issuing a redirect. Here's a Django view that generates the session and issues a redirect to it:
@login_required
@require_POST
def create_portal_session(request):
    stripe.api_key = djstripe_settings.STRIPE_SECRET_KEY
    portal_session = stripe.billing_portal.Session.create(
        customer=request.user.customer.id,
        return_url="https://example.com/subscription-details/",
    )
    return HttpResponseRedirect(portal_session.url)
What's more complicated is keeping the changes made in the billing portal (or anywhere else in Stripe) in sync with your app. This is where webhooks enter the picture.
Keeping things in Sync with Webhooks
As we've already seen, Stripe handles the heavy-lifting on all subscription changes, including automatically charging cards, sending optional reminder and invoice emails, and letting our customers manage their subscriptions via the billing portal. But we still need to know what happened in Stripe.
Webhooks are how Stripe notifies your app about events that have happened in Stripe. Basically, you configure a URL endpoint in Stripe, and Stripe pushes updates to that URL for any event you've chosen to subscribe to. Then you add application logic to process those events. Pretty straightforward, yeah?
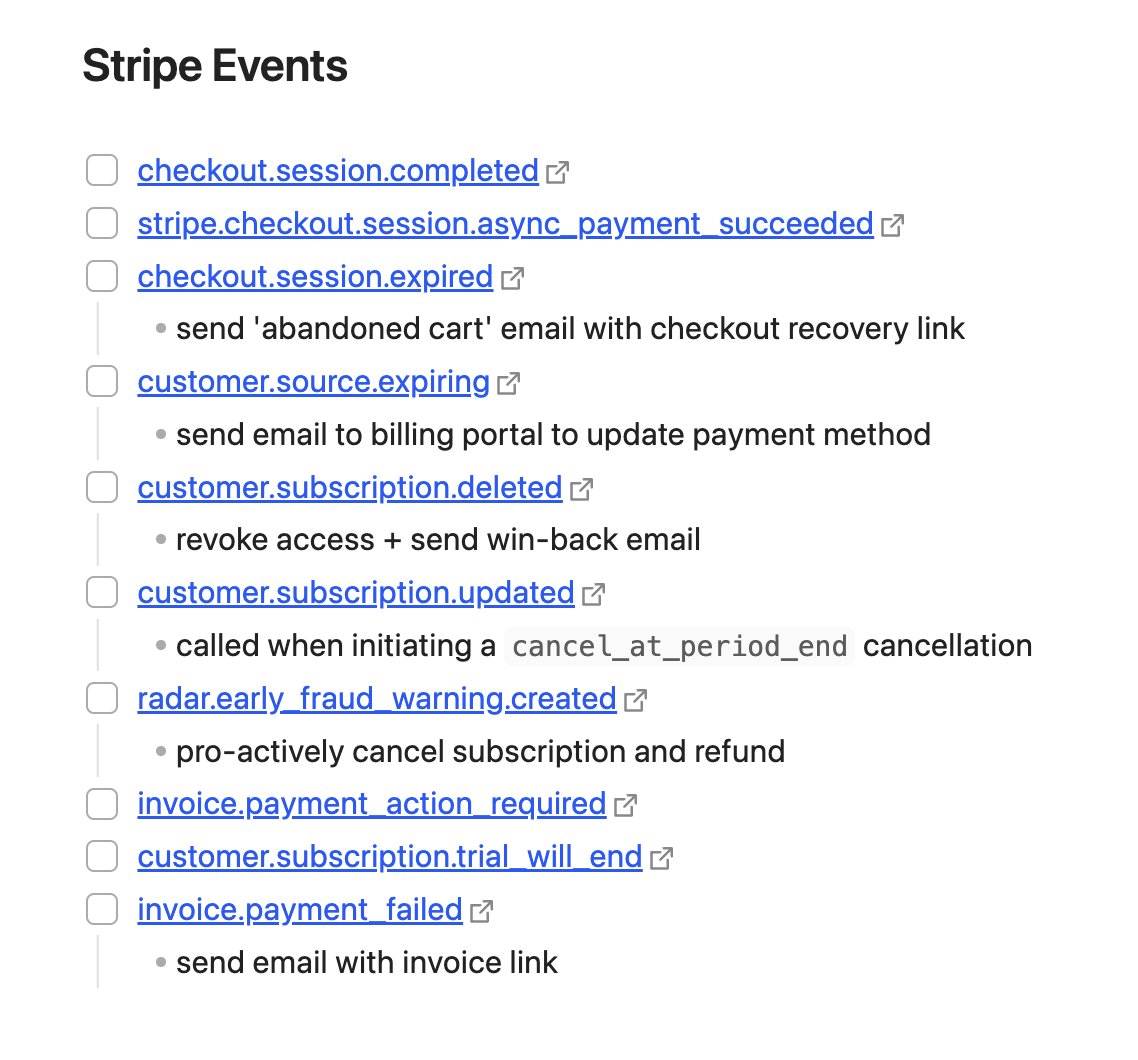
Important webhooks for subscriptions
There are loads of webhook events, but only a handful are really important for a subscription workflow. These ones are the most critical:
| Webhook ID | What has happened | What you should do |
|---|---|---|
checkout.session.completed |
A checkout session completed. | Provision the subscription if not already done. |
customer.subscription.deleted |
A subscription was canceled. | Cancel / deactivate the subscription in your app. |
customer.subscription.updated |
A subscription was changed. | Check the new subscription details update accordingly. |
Why do we need to provision subscriptions in a webhook?
Above, we provisioned the subscription via the subscription confirmation page. So why bother with the webhook? Well, if the user closes their browser after paying in Stripe but before loading that page, the subscription won't get provisioned. Then we would be charging them, but not giving them access in our app. This would be a big problem!
This gets solved by the checkout.session.completed event.
Stripe guarantees that it will send us this event (and will retry until it succeeds),
so we can provision the subscription there, if not already done.
Then, the next time the user logs into the app they'll see they've been subscribed.
The code we want to call in response to this webhook is basically the same as what we called in our confirmation page.
For a longer list of events you can refer to this list, courtesy of Marc Köhlbrugge.
Webhooks and dj-stripe
The dj-stripe library has built-in support for webhooks—one of its most useful features.
Out-of-the-box you can set it up to synchronize all Stripe data models to your local database,
and you can quickly add custom webhook handlers.
Here is some sample code that shows how to send the Django admins an email when a subscription is cancelled:
from django.core.mail import mail_admins
from djstripe import webhooks as djstripe_hooks
from djstripe.models import Customer

@djstripe_hooks.handler("customer.subscription.deleted")
def email_admins_when_subscriptions_canceled(event, **kwargs):
    # example webhook handler to notify admins when a subscription is deleted/canceled
    try:
        customer_email = Customer.objects.get(id=event.data["object"]["customer"]).email
    except Customer.DoesNotExist:
        customer_email = "unavailable"

    mail_admins(
        "Someone just canceled their subscription!",
        f"Their email was {customer_email}",
        fail_silently=True,
    )
For more details, see the dj-stripe webhooks documentation.
Conclusion
That's it for the 2023 version of this guide. We've covered everything you need to build a production-ready subscription application with Django and Stripe.
Of course, managing the subscription is just the start. Once you've got that information you'll likely want to integrate it into your application workflows, for example, limiting features to a particular set of plans (feature-gating), or handling more complex billing models like per-seat, usage-based, and so on.
If you'd like to have input on which of those topics get covered next, you can fill in the following form:
What should the next article be about?
Changelog
November 2023 major updates
- Added section on choosing a Stripe integration model
- Overhauled subscription workflow to use the embedded pricing table and removed Stripe elements example.
- Added section on the customer portal.
- Added section on webhooks.
- Updated Django examples to 4.2 / Python 3.11
- Fixed many links to outdated documentation
- Fixed all references to the legacy
PlanStripe model to use thePriceobject. - Simplified the data modeling recommendations to always put subscription and customer on the same model.
- Many smaller copy edits.