
Anyone who has used ChatGPT—which is likely nearly everyone reading this—should be familiar with the experience of watching it write out its responses to you in real time—almost as if the machine on the other end of the wire is typing its words to you one at a time.
Have you ever wondered how this works? How do you make a chatbot that types like that in a web browser?
There are a few ways to do this, but in this post we'll focus on the most common option: websockets. By the end of this post you should have a good understanding of what websockets are and how you can use them in your projects. We'll do this by building our own chatbot with Django and OpenAI.
We'll also use two other libraries:
- Channels—the most popular library for using websockets with Django.
- HTMX—the lightweight front end library that works great with Django templates.
First we'll cover the basics of websockets, then show how you can use these technologies to build a real-time, streaming, asynchronous chatbot in your application in just a handful of steps.
Demo!
If you'd like to try out the app we're building, you can do that here. Note that in order to prevent abuse of our OpenAI keys, the demo requires creating an account.
Here's the outline:
- A whirlwind overview of websockets
- Creating your Chat UI View
- Setting up a new Channels route and consumer
- HTMX and Websockets: an overview
- Integrating HTMX Websockets into our Chat UI
- Adding responses from ChatGPT
- Adding history
- Making it suitable for production with asynchronous support
- Get the code
A whirlwind overview of websockets
Websockets sound fancy, and anyone who has never used them will probably think of them as black magic. But, conceptually, they are quite simple!
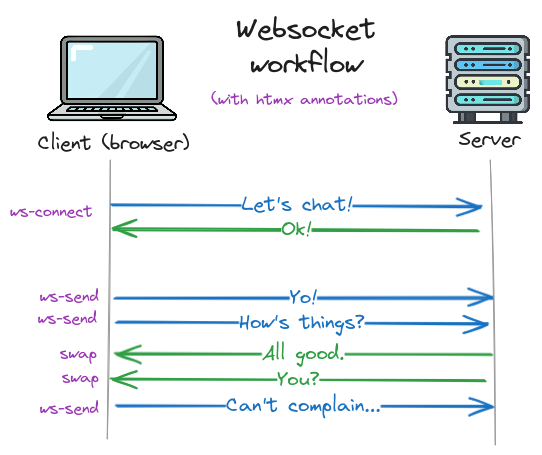
Let's first talk about how a traditional HTTP request works. In this world you have a client (usually the browser), and a server (usually the...well, server). The client starts off by sending a request to the server (e.g. "please load this webpage"). The server then processes the request and sends a response to the client (e.g. "here it is!"). Once the content has been delivered to the client, the connection is closed and the request is completed.
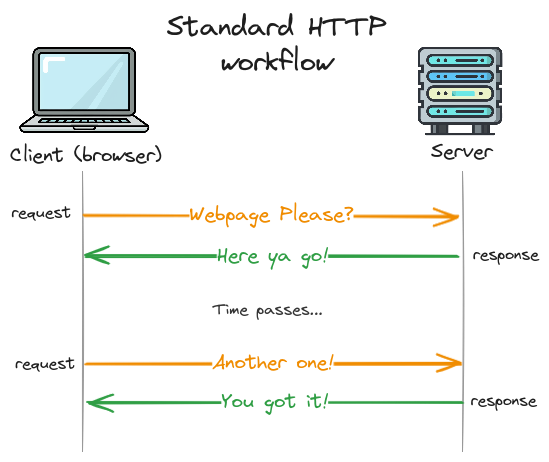
You can think of this HTTP interaction like writing a letter to a pen pal. You send the letter, it gets delivered, your pen pal reads it, and then they send you a response. Each letter gets one and only one response, and everything happens serially.
If HTTP is like letter-writing, then websockets is like making a phone call. Instead of sending requests and getting responses, the client first opens a connection to the server (i.e. calls someone). Once the connection is established (call is answered), both the client and server can send messages over the channel as much as they want (the conversation). Then, at some point the channel is closed (hanging up) and the conversation is over.
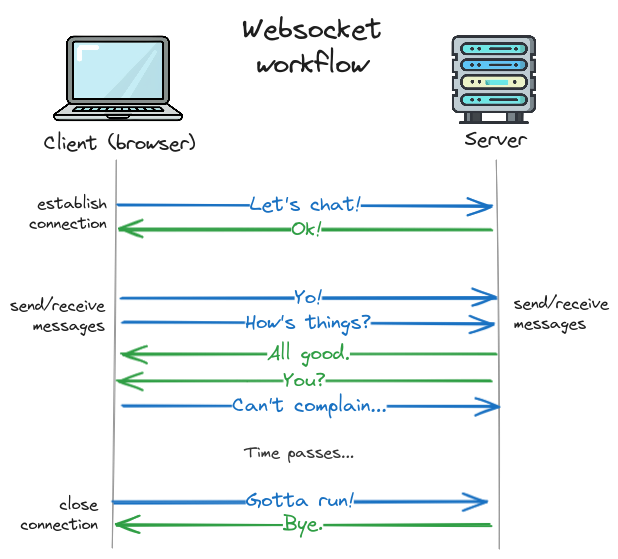
The main difference between normal HTTP requests and web sockets is the "open channel" where both client and server can send and receive messages at any time. This makes websockets a good choice when you are expecting multiple messages from the server in a row—for example in a typing UI.
What about SSE?
Server-side events, or SSE is another good choice for this type of interface. Like websockets, SSE allows sending multiple messages from the server back to the client. The main difference between SSE and websockets is that SSE is one-direction only (server to client). You can also implement a streaming Chat UI with SSE, though the code ends up a bit more complicated.
Websockets and channels
Channels is the most popular library for using websockets with Django, and it's what we'll use in this guide.
We won't cover channels in depth, but we can quickly map our understanding of websockets to the core component of channels which is called a consumer.
Here are the key functions available on channels' WebsocketConsumer class,
which we'll be using for this project.
You can clearly see how each function maps to the various operations of establishing a connection,
sending and receiving messages, and ending the session.
class WebsocketConsumer:
    """
    A WebSocket consumer.
    """

    def connect(self):
        """
        Called when a new websocket connection is established.
        """

    def accept(self, subprotocol=None):
        """
        Accepts a socket request
        """

    def receive(self, text_data=None, bytes_data=None):
        """
        Called with a decoded WebSocket frame.
        """

    def send(self, text_data=None, bytes_data=None, close=False):
        """
        Sends a reply down the WebSocket.
        """

    def close(self, code=None):
        """
        Closes the WebSocket from the server end.
        """

    def disconnect(self, code):
        """
        Called when a WebSocket connection is closed.
        """
Consumer methods for handling websockets.Here's how these functions are represented in our diagram:
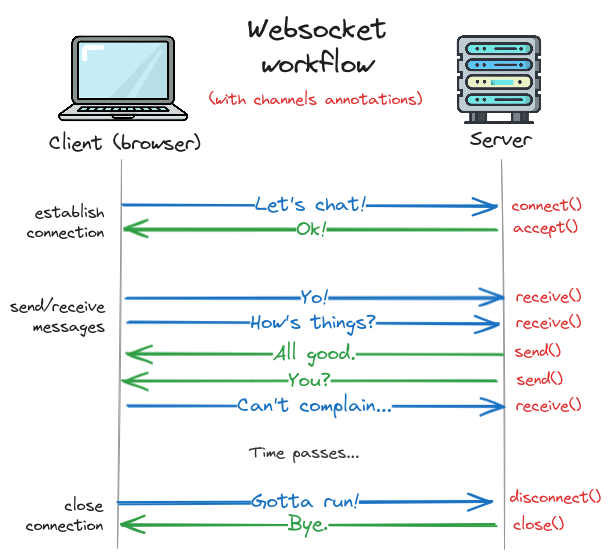
Understanding this structure will make it clear how to write our consumer code later!
Applying websockets to a chatbot application
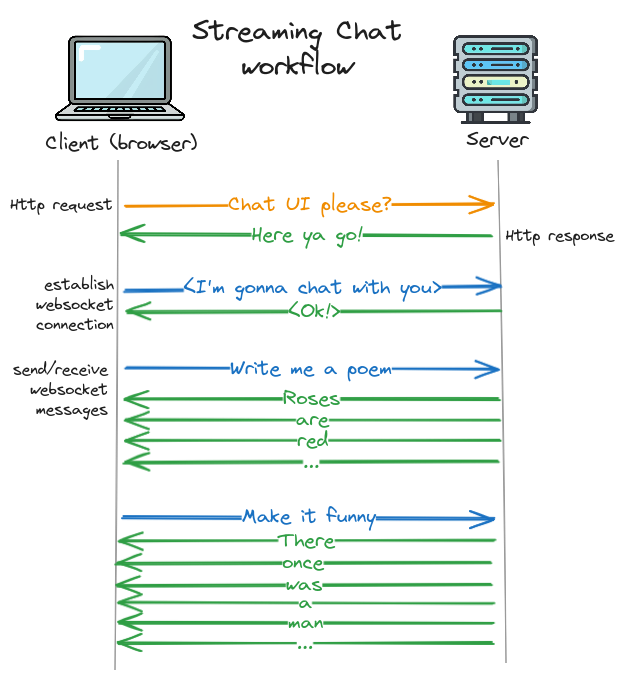
Now that we understand websockets, we can map the concepts onto our chatbot application. Big picture, here’s how it will work.
First, we load our chat page in a normal HTTP request, which is served by a traditional Django view. This view returns a page with our UI scaffolding (a chat window and an input bar).
Once the page is loaded, the browser opens a websocket connection to our server. When the connection is established, the client and server can start sending each other messages. New messages from the user will be sent from the client to the server, and responses from system will be sent from the server to client. Importantly, since the server can now send arbitrary messages to the client at any time, we can implement streaming responses.
In diagram form, it will look something like this, with one message from the server for every word:
Now let's go through these steps one-by-one to see how it works in practice.
Creating your Chat UI View
As we mentioned, the first step is to create a standard Django view to hold our chat UI. You can add this view to a new Django app or any existing one.
This guide won't go through all the steps of setting up a Django project. If you'd like to do that, we recommend first doing the Django tutorial or using a starter project like SaaS Pegasus.
This guide assumes the view is added to an existing app called "chat", though you could also of course create a new app. Either way, we need to add a URL, a view and a template:
In urls.py:
urlpatterns = [
     # your other URLs
    path("chat/", views.chat, name="chat"),
 ]
In views.py:
@login_required
def chat(request):
    return TemplateResponse(request, "chat/single_chat.html")
And then in the single_chat.html template:
{% extends "web/base.html" %}
{% block body %}
<div id="chat-wrapper">
  <div id="message-list">
    <div class="chat-message is-system">
      Hello, what can I help you with today?
    </div>
  </div>
  <form id="chat-input-bar">
    <input name="message" type="text" placeholder="Type your message..."
    <button type="submit">{% translate "Send" %}</button>
  </form>
</div>
{% endblock %}
We aren't including styling information in the template to avoid clutter, but once styles are added this will produce a page that looks something like this:
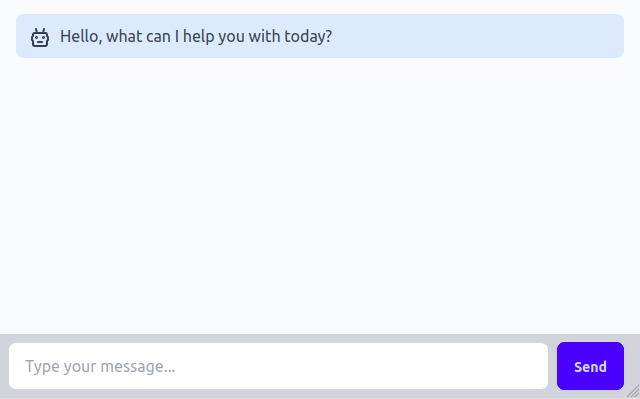
Note that this template doesn't do anything yet, it's just the skin that we'll add our functionality to. So let's do that!
If you'd like the code for a fully working ChatGPT application you can drop directly into your Django projects, enter your email address below to get a link to the repository.
Setting up a new Channels route and consumer
Before updating the front end, we need to set up our Channels consumer. We'll assume you've already got a working Channels project and just show the changes to add a new route and consumer.
If you need to get channels integrated into your application, I recommend starting with the first two parts of the excellent Channels tutorial which will help you create your first routes and consumers and get you to the point where you can run the code here.
Adding channels endpoints to your application is similar to Django views, just with slightly different conventions.
Instead of adding the route to a urls.py file, we put it in routing.py:
from django.urls import path
from . import consumers

websocket_urlpatterns = [
    # other websocket URLs here
    path(r"ws/chatgpt-demo/", consumers.ChatConsumer.as_asgi(), name="chatgpt_demo"),
]
And then instead of creating a view, we create a consumer.
In consumers.py:
from channels.generic.websocket import WebsocketConsumer


class ChatConsumer(WebsocketConsumer):

    def receive(self, text_data):
        # our webhook handling code will go here.
        print(text_data)
This gives us a basic websocket endpoint that prints out anything we send it.
We finally need to add our websocket_urls to our root channels router.
In asgi.py:
from chat.routing import websocket_urlpatterns

application = ProtocolTypeRouter(
    {
        "http": django_asgi_app,
        "websocket": AllowedHostsOriginValidator(
            AuthMiddlewareStack(
                URLRouter(
                    websocket_url_patterns,  # add this alongside other routes.
                )
            )
        ),
    }
)
For more on channels routing see this page.
HTMX and Websockets: an overview
Next up, we want to wire our front end template to talk to our new consumer. We'll use HTMX and the websockets extension for this.
First, we need to understand a bit about HTMX and websockets work together.
This guide doesn't assume any prior knowledge of HTMX, but we cover the core concepts quite quickly. For a longer treatment of using HTMX and Django, see "Django, HTMX and Alpine.js: Modern websites, JavaScript optional".
The core workflow of traditional HTMX-based UIs is:
- The client makes an HTTP request.
- The server sends back some HTML.
- The client swaps it somewhere onto the page.
With websockets, things work similarly, except we can no longer guarantee that things happen in the normal call-and-response HTTP way. Instead, the client needs to be able to receive messages at any time.
This means that the above steps get split out into the websocket primitives of sending and receiving.
So the HTTP requests in step 1 get replaced by the websocket send event (called ws-send in htmx).
And steps 2 and 3 happen together every time a message is received.
We also have an additional initial step of establishing the websocket connection before anything else can happen (ws-connect).
Confused? Don't worry, it'll be clearer with an example.
Integrating HTMX Websockets into our Chat UI
Big picture, we want to do three things:
- Establish a connection to a websocket endpoint.
- Send messages to that endpoint when we have new chat messages.
- Display messages from that endpoint when we receive responses.
We'll go through these step-by-step.
Installation and establishing the websocket connection
First we have to add HTMX and the websocket extension to our page head.
<head>
  <!-- other stuff here -->
  <script src="https://unpkg.com/[email protected]"></script>
  <script src="https://unpkg.com/htmx.org/dist/ext/ws.js"></script>
</head>
Next we'll use the HTMX markup to connect to our websocket endpoint, by making the following change to our template:
-<div class="chat-wrapper">
+<div class="chat-wrapper" hx-ext="ws" ws-connect="/ws/chatgpt-demo/">
  <div id="message-list" class="chat-pane">
    <div class="chat-message-system">
Here we have added two things to our chat-wrapper component.
The hx-ext="ws" tells the extension that we are using websockets for this component,
and the ws-connect="/ws/chatgpt-demo/" tells it where to connect.
This URL should match the route we set up in routing.py above.
Now when we load the page, HTMX will open a connection to this websocket—which will be handled by our consumer backend.
Now we're ready to send and receive messages over the websocket.
Sending messages from the client to the server with ws-send
With the connection established, we can move on to sending messages.
Thankfully, HTMX makes this ridiculously easy.
All we have to do is add the ws-send attribute to the form where we want our messages to go.
Here's the updated code for our chat input bar:
-<form class="chat-input-bar">
+<form class="chat-input-bar" ws-send>
   <input name="message" type="text" placeholder="Type your message..." >
   <button type="submit">Send<button>
 </form>
With the addition of those seven characters, our form submissions will now send the messages over the websocket to our consumer backend. HTMX will automatically serialize these messages as JSON—so our form input of "message" gets turned into a JSON structure that looks like:
{
  "message": "our message"
}
We can then parse and process these incoming messages in our consumer code:
import json

class ChatConsumer(WebsocketConsumer):

    def receive(self, text_data):
        # our webhook handling code goes here
        text_data_json = json.loads(text_data)
        message_text = text_data_json["message"]
        # do something with the user's message
Now our messages are successfully being sent to our chat backend. But how do we respond?
Before we get to that, we need to understand how the front end will handle our responses.
How HTMX swaps messages from the server into the UI
Recall that the core workflow we will use when pushing messages back to the UI is:
- Send across some HTML.
- Swap it somewhere into our page.
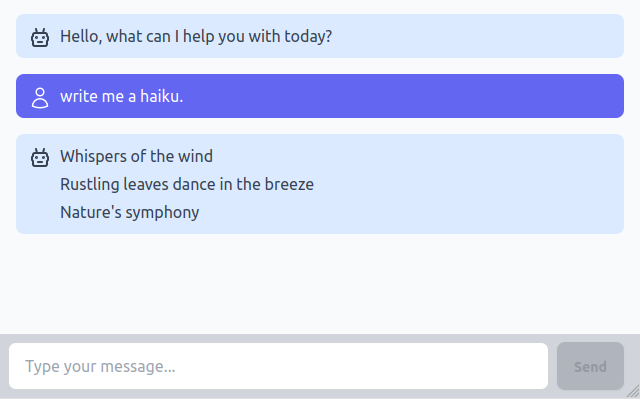
Let's first look at how the swapping logic is handled. Recall our original template, which has a chat wrapper, and a list of messages containing our original system greeting.
What we want to do is append new messages to the message list—so they show up below like this:
In other words we want to insert the messages into the template where the comment is below:
<div class="chat-wrapper" hx-ext="ws" ws-connect="/ws/chatgpt-demo/">
  <div id="message-list" class="chat-pane">
    <div class="chat-message is-system">
      Hello, what can I help you with today?
    </div>
    <!-- we want to add our new messages here -->
  </div>
</div>
The way we can do this from our websocket events is by using the same markup/workflow as HTMX's out-of-band swaps—which is just a fancy way of saying "swap the content into the page element with the same ID".
Here's the HTML we want to send back:
<div id="message-list" hx-swap-oob="beforeend">
  <div class="chat-message">
    <!-- our user's input message -->
  </div>
</div>
Let's see how this works.
The first thing to note is that we're sending back an element with an id of "message-list".
This tells HTMX to swap our response into the element with the ID of "message-list"—i.e. the div we want to add our messages to.
The other thing we need to tell HTMX is where in the div they should go.
This is handled by the special attribute called hx-swap-oob.
The hx-swap-oob attribute can take any valid hx-swap value,
which tells HTMX how to swap the content in, e.g. by replacing the whole element, putting it at the beginning, the end, and so on.
In this case we want to append our message to the end of the message-list, so we tell HTMX to swap it
before the end of the element with a value of "beforeend".
Once HTMX swaps the HTML into the page, the final output will look like this:
<div class="chat-wrapper" hx-ext="ws" ws-connect="/ws/chatgpt-demo/">
  <div id="message-list" class="chat-pane">
    <div class="chat-message is-system">
      Hello, what can I help you with today?
    </div>
    <div class="chat-message">
      write me a haiku
    </div>
  </div>
</div>
Cool!
Now we're ready to update our consumer backend to send these messages. Let's see how that works.
Sending messages from our websocket consumer
Thankfully, sending messages over our websocket is basically as simple as a function call—specifically consumer.send().
First we'll update our consumer to show the user's own message back to them.
Here's the updated code of our receive function, which uses Django's render_to_string function to
render a template to a string and then sends the result over the websocket channel:
class ChatConsumer(WebsocketConsumer):
    def receive(self, text_data):
        text_data_json = json.loads(text_data)
        message_text = text_data_json["message"]

        # show user's message
        user_message_html = render_to_string(
            "chat/ws/chat_message.html",
            {
                "message_text": message_text,
                "is_system": False,
            },
        )
        self.send(text_data=user_message_html)
And the updated contents of our user message template, where we've added our context variables.
<div id="message-list" hx-swap-oob="beforeend">
  <div class="chat-message{% if is_system %} is-system{% endif %}">
    {{ message_text }}
  </div>
</div>
chat/ws/chat_message.html template.
System (AI) messages will have an additional "is-system" class that we can use for styling
them differently from the user's messages.
Adding responses from ChatGPT
Ok, we're getting close. We have our Chat UI, our websocket connection, and we have sent and displayed the user's input message. Now for the main event—shipping the message to our language model and sending back the response. Let's dive into how that works.
Sending back the system's message all at once
Before we get into streaming, let's start by sending back the system's response as a single message.
First we have to call OpenAI:
client = OpenAI(api_key=settings.OPENAI_API_KEY)
openai_response = client.chat.completions.create(
    model="gpt-3.5-turbo",
    messages=[
        {
            "role": "user",
            "content": message_text,
        }
    ],
)
Then extract the response:
system_message = openai_response.choices[0].message.content
And finally, send it back over the websocket using the same swap logic and template as our user's message:
system_message_html = render_to_string(
    "chat/ws/chat_message.html",
    {
        "message_text": system_message,
        "is_system": True,
    },
)
self.send(text_data=system_message_html)
This will produce the resulting final message list:
<div class="chat-wrapper" hx-ext="ws" ws-connect="/ws/chatgpt-demo/">
  <div id="message-list" class="chat-pane">
    <div class="chat-message is-system">
      Hello, what can I help you with today?
    </div>
    <div class="chat-message">
      write me a haiku
    </div>
    <div class="chat-message is-system">
      Whispers of the wind...
    </div>
  </div>
</div>
Which renders as:
What about rendering?
In order to avoid distracting from the core point of the article, we're skipping over some details, including how the text from ChatGPT gets converted to html in your template. We recommend using a markdown-to-HTML renderer like this library. This will add support for line breaks, code blocks, lists, and other common text formats.Adding streaming responses
Ok, almost there! Let's add streaming.
Now, instead of getting the whole response form OpenAI and swapping it into the template at the end, we will instead:
- Return (and swap in) in an empty system message component immediately.
- Call OpenAI with a streaming option.
- Swap each token in the response stream into our system message contents.
An important change is that we are now going to swap different server messages into different places in our UI—the messages go into the message list, but the streaming response goes into an individual message element.
First, before calling OpenAI at all, we'll send back the system message template with an empty body. We can use CSS to style it as "loading".
We also need to generate a unique ID for the message so that we can swap future messages into this element:
message_id = uuid.uuid4().hex
We'll pass this ID in as the message_id variable to our template like so:
system_message_html = render_to_string(
    "chat/ws/chat_message.html",
    {
        "message_text": "",  # we don't send message text since we haven't gotten a response yet
        "is_system": True,
        "message_id": message_id,  # and we add an ID
    },
)
self.send(text_data=system_message_html)
Then we can set the ID on the message div in the template:
<div id="message-list" hx-swap-oob="beforeend">
  <div class="chat-message{% if is_system %} is-system{% endif %}"
       {% if message_id %}id="{{ message_id }}"{% endif %}> <!-- we added this line -->
    {{ message_text }}
  </div>
</div>
After calling this code, the message list will look like this (choosing a value of 12345 for message_id):
<div id="message-list" class="chat-pane">
  <div class="chat-message is-system">
    Hello, what can I help you with today?
  </div>
  <div class="chat-message">
    write me a haiku
  </div>
  <div class="chat-message is-system" id="12345">
    <!-- our empty div where we'll swap the streaming response -->
  </div>
</div>
Next we need to use the stream=True OpenAI API option to stream our response back from ChatGPT:
client = OpenAI(api_key=settings.OPENAI_API_KEY)
openai_response = client.chat.completions.create(
    model=settings.OPENAI_MODEL,
    messages=[
        {
            "role": "user",
            "content": message_text,
        }
    ],
    stream=True,  # add this line to tell OpenAI to stream.
)
When we use the streaming API, we also now have to iterate through the response.
For each chunk we get back, we want to swap the content at the end of the element with an ID of message_id.
We can use the same hx-swap-oob="beforeend" value, with a different ID, like so:
for chunk in openai_response:
    message_chunk = chunk.choices[0].delta.content
    self.send(text_data=f'<div id="{message_id}" hx-swap-oob="beforeend">{message_chunk}</div>')
Now, the content coming back from ChatGPT will get inserted at the end of the relevant message, finally resulting in our nice streaming experience.
We did it!
Adding history
Okay, before we take our victory lap there's one more detail we forgot: history. Right now every separate message is treated as a standalone interaction with our AI, but we actually want the bot to remember what we've asked it so we can ask followup questions in our chat session.
To do this we'll have to plug into some of the other methods in our consumer class. In particular, whenever a new client connects, we want to initialize an empty list of messages:
class ChatConsumer(WebsocketConsumer):
    def connect(self):
        self.messages = []
        super().connect()
Then, when we get a new message from the user, we'll append it to our message list in the format expected by OpenAI:
# in the receive() function
self.messages.append(
    {
        "role": "user",
        "content": message_text,
    }
)
Next, we have to update our API call to pass the entire list of messages like so:
openai_response = client.chat.completions.create(
    model="gpt-3.5-turbo",
    messages=self.messages,  # pass the entire list here
    stream=True,
)
And finally, we have to add our system response to the message list once we're done:
chunks = []  # collect all the chunks in this list
for chunk in openai_response:
    message_chunk = chunk.choices[0].delta.content
    self.send(text_data=f'<div id="{message_id}" hx-swap-oob="beforeend">{message_chunk}</div>')
    chunks.append(message_chunk)
# and when we're done, join them together when we add the system message in our message list
self.messages.append({
    "role": "system",
    "content": "".join(chunks)
})
Now our bot will have a unique history for every different user session!
Making it suitable for production with asynchronous support
Are we done? Well, the bot works great, but there's one final problem. Everything is still happening synchronously.
What does that mean? Without going into a full explanation of asynchronous versus synchronous code, it means our calls are blocking. Specifically our calls to OpenAI. This means that while we are waiting for OpenAI to generate and stream its responses to us, our application threads are sitting there, blocked, and not able to do any other work.
In practice, it means that our app won't support very many concurrent sessions before things start getting slow. So, finally, lets look at how to make this code asynchronous.
Asynchronous Django is a big topic, and giving it a proper treatment would take an entire separate article. But—it's not too difficult to make the above example async, so we will quickly run through those changes.
The first step is to use channels' AsyncWebsocketConsumer class instead of WebsocketConsumer:
-from channels.generic.websocket import WebsocketConsumer
+from channels.generic.websocket import AsyncWebsocketConsumer

# other code here

-class ChatConsumer(WebsocketConsumer):
+class ChatConsumer(AsyncWebsocketConsumer):
AsyncWebsocketConsumer class.Next we have to declare all our methods—and specifically the receive method—as asynchronous,
using the async keyword:
-    def receive(self, text_data):
+    async def receive(self, text_data):
        # our webhook handling code goes here
Then, whenever we send messages to the client we have to await them:
-        self.send(text_data=user_message_html)
+        await self.send(text_data=user_message_html)
We also need to use the asynchronous OpenAI client, and await our API calls:
-        client = OpenAI(api_key=settings.OPENAI_API_KEY)
+        openai_response = client.chat.completions.create(
-        client = AsyncOpenAI(api_key=settings.OPENAI_API_KEY)
+        openai_response = await client.chat.completions.create(
            model="gpt-3.5-turbo",
            messages=self.messages,
            stream=True,
        )
And finally, we need to iterate through the response asynchronously:
-        for chunk in openai_response:
+        async for chunk in openai_response:
And voila! Now our requests won't block and our application should be handle way more users at the same time without breaking a sweat.
Get the code
Hooray, we're finally done! We've built an asynchronous, streaming chatbot in just a few steps.
If you would like the complete source code of a working example, that includes everything we discussed here and some basic styling with Tailwind CSS, just fill in the form below.
And if you'd like a version that also includes user-based sessions, asynchronous database access, chat history, and loads more functionality—check out SaaS Pegasus: the Django boilerplate for AI apps.
I hope this has been helpful, and let me know if you have any questions or feedback by sending a mail to [email protected].
If you'd like the code for a fully working ChatGPT application you can drop directly into your Django projects, enter your email address below to get a link to the repository.