Published: August 12, 2022

This is Part 6 of Modern JavaScript for Django Developers.
If you've ever written a front end in React, Vue, or whatever framework-du-jour happens to be popular in the current moment you've experienced this problem. You need to fetch some data—let's say a list of employees—from the backend and show it in your front end. And the tool you have is the API.
And so you write some code that looks something like this:
fetch('/api/employees/')  // get the data from the API
  .then(res => res.json())  // parse to JSON
  .then(
    (responseJson) => {
      let employees = parseEmployeesFromApiResponse(responseJson);  // convert API data to objects
      addEmployeesToUI(employees);  // display objects on the front end
    }
  );
}
Done!
Of course, you probably also want to create employees, so you write some similar code to handle that. And then you also want to update employees and delete employees. More code. And of course your list needs to paginate. And all your API requests need appropriate error handling. And eventually you've produced quite a lot of boilerplate JavaScript for a simple CRUD app.
Now, there's nothing inherently wrong with this approach, and many a successful project has a front end written exactly this way.
But what if I told you there was a better way?
What if I told you that instead of writing all this boilerplate API code, mucking around with raw HTTP libraries
like axios and fetch, converting your JavaScript objects to and from their API formats, and so on,
you could get all of that functionality for free.
And it would be kept in sync, so that whenever anything changed in your APIs,
the front end would just update itself automatically.
Sound too good to be true?
Well it's not! And it's not even difficult to set up.
In this guide—part six of the "Modern JavaScript for Django Developers" series—we're going deep on working with Django APIs in your front end. We'll show you how you can leverage the OpenAPI standard to create front end API clients that drastically improve the experience of developing against your APIs.
This is the guide that I wished existed when I was trying to figure out how best to work with Django REST Framework in a React front end.
Buckle in and let's go!
- A quick overview of APIs and Django
- Who uses APIs
- Your API Ecosystem
- API standards
- Your OpenAPI specification
- Creating OpenAPI specifications with drf-spectacular
- Automatically generated API clients in (almost) any language
- Using your generated API client in your front end
- Improving your API clients and documentation with annotations
- Wrapping up
A quick overview of APIs and Django
Before we go deep on the specifics, we'll first cover the basics of APIs. If you're impatient, feel free to skip ahead, but if you're relatively new to the web development world, this section might be a helpful review.
API stands for application programming interface. In the web world, an API can be thought of as any URL served by your application that is intended to be consumed by a program (as opposed to a browser or a person).
Most APIs expect and return data formatted as JSON—a way of writing data that looks like this:
{
  "type": "message",
  "value": "Hello world!"
}
REST vs GraphQL
There are currently two dominant high-level standards for working with APIs: REST and GraphQL.
REST is an older and likely more familiar standard for most developers. It's probably what you immediately think of when you think of APIs. REST APIs conform to a set of specific criteria—e.g. they must be cacheable and stateless. In the REST world there are different URL endpoints for each resource, and each endpoint often supports different operations using different HTTP methods (e.g. retrieving data with GET and updating it with POST/PUT). In Django, if you're using REST you're likely also using Django REST Framework (DRF).
GraphQL is a newer standard, and is gaining wide adoption for its flexibility and performance. In the GraphQL world, the client doesn't just hit an endpoint, but also specifies the specific data that it wants. GraphQL can make apps more efficient by bundling different types of data together and returning only the properties needed by the front end. It also works uniquely well with NoSQL databases. In the Django world, GraphQL is most commonly supported with the Graphene Python library.
For the rest of this article we're going to focus on REST APIs and Django REST Framework—but GraphQL is a cool project and you can do similar things with it!
Who uses APIs
In most projects the term "API" could refer to one of two different things:
- Internal APIs are for your application. They are called by your JavaScript front end or mobile app.
- External APIs are for other applications. They are intended for third-party clients, integrations with other systems, or for developers to work with your application data.
This isn't a black and white breakdown. Some apps will use "external" APIs internally—a practice that is especially common in service-oriented architectures, and occasionally "internal" APIs get used externally—e.g. by data scrapers. But it's still a useful practical distinction.
Let's look at these two categories in a bit more detail.
Internal APIs are for your front end(s)
When people talk about APIs they often think of external APIs, but internal APIs are far more common. The most common consumer of your APIs is your own app.
Any request from a front end of your app—whether it's a browser or a mobile app—to the back end is an API. In the web world, most of this API access happens in JavaScript. If you're using a modern JavaScript framework like React, you'll use APIs for the majority of the actions your users take in the front end. In a single-page application (SPA) basically everything is an API.
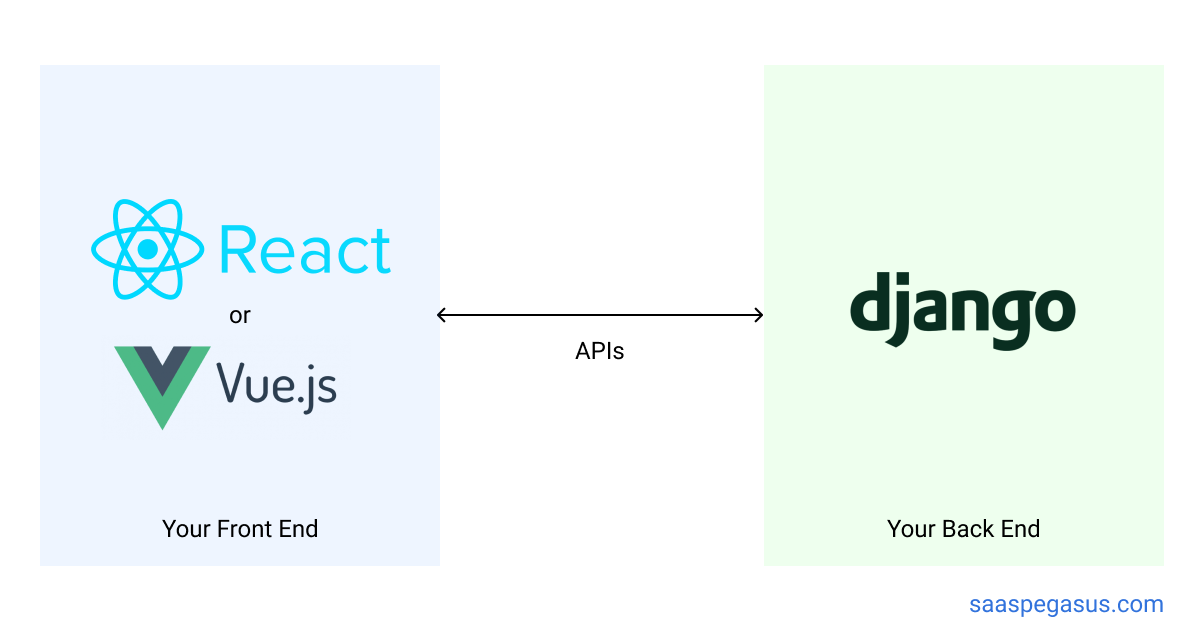
Internal APIs can be a bit of a wild-west. They are often have poor—or zero—documentation. Also, many internal APIs get created for very specific needs of a single page. If you need to display a "recent projects" list, you make a "recent projects" API—and so on. If you follow this pattern of development your internal APIs can become a mess of random things that are tightly coupled to how they are used. This isn't always a problem, but it's worth knowing!
The nice thing about internal APIs is that—well—they're internal. That means you can arbitrarily change things—or even delete APIs entirely—so long as you update/check all the internal code that uses it. There are no expectations of API stability apart from them solving your own apps needs.
External APIs expand your ecosystem
If internal APIs are for your app, then external APIs are for... everyone else.
Imagine you're Twitter and it's 2008. You've built a social media platform for the web that's taking off. But now this new thing called an iPhone has come out and you want to have a snazzy app to run on it. The only problem is that you don't have enough people on your team to build a good one quickly. So, while you're building your app, you decide to publish a set of APIs that provide access to users' timelines, let them author new tweets, view and follow other accounts, and so on.
Suddenly, a whole ecosystem of new Twitter apps emerges! Twitter didn't have to make a good iPhone app—at least for several years—someone else was happy do it for them! And they did.

This example demonstrates the main value of external APIs: letting other developers or applications work with yours.
External APIs are different from internal APIs in a few ways. To start with, they're (hopefully!) better documented—since external developers need to be able to work with them. Also they (hopefully!) tend to be a bit more consistent. Unlike internal APIs, external APIs are more likely to have been designed (hopefully!) prior to being created.
Importantly, external APIs also have external dependencies. With external APIs you can't reasonably introduce breaking changes without providing substantial advance notice to your community. This often results in external APIs being versioned, and supported for a very long time.
Now that we have a big-picture understanding of APIs and how they're used we can move onto the ecosystem that surrounds APIs.
Your API Ecosystem
APIs are a good starting point, but they aren't all that useful without some other pieces. A well-functioning API ecosystem has at least three pieces:
- The APIs themselves.
- API documentation, which tells other people how to work with the APIs.
- API clients, which can be used by developers to work directly with the APIs.
Producing all of these things sounds like a lot of work, but the rest of this post should convince you that it's not. But, before getting to that, let's first briefly touch on these other parts of your API ecosystem.
API Documentation
You know how every time you have a question about Django you find your way to the docs and there's always an up-to-date, clear explanation of the thing you're trying to figure out? That's a huge part of what makes Django great and plays a major role in its continued popularity.
For external APIs—like with Django or any programming framework—documentation is a critical part of the ecosystem. An external API without documentation is almost useless. No one will know it exists, and if they do manage to find out about it, they won't know how to use it. API documentation is less critical for internal APIs where developers have access to the code and are willing to go through additional work, but it's still nice to have.

API Clients
An API client is a library designed to work with your API. There's nothing developers like more than having an API client—it takes all the guesswork out of working with your APIs!
Let's go back to the example from the beginning, where we wanted to get a list of employees from a REST API and do something with them.
Without an API client the series of steps a developer would take would be something like:
- Figure out the right endpoint for the API.
- Create an HTTP request to that endpoint.
- Parse the response as JSON.
- Convert the returned JSON data into employee data you need.
- Work with the data.
You can see each of these steps in the code sample:
// the /api/employees/ endpoint had to be looked up from the docs
fetch('/api/employees/')  // create the raw HTTP request
  .then(res => res.json())  // parse the response to JSON
  .then(
    (responseJson) => {
      // convert API data to objects we can work with
      let employees = parseEmployeesFromApiResponse(responseJson);
      addEmployeesToUI(employees);  // finally, work with the data
    }
  );
}
And remember, this doesn't even include things like authentication, pagination, or error handling, and needs to be reproduced for each operation and each API. It can quickly become lot of code.
With an API client that process would look more like this:
import {EmployeeApi} from "../api-client";
// get the parsed employee objects directly from the API client in one call
let employees = EmployeeApi().employeesList();
addEmployeesToUI(employees);  // and work with the data
API clients remove all the technical implementation details of the APIs for you, so that you can focus on what the API does. API clients are hugely useful for developers working with internal or external APIs.
Challenges with API documentation and clients
It's clear from the above that API documentation and clients are really useful. So why don't more applications have them?
The simplest answer is that it can be a lot of work. First you have to create the docs/client—which is a lot of work. Then you have to maintain the docs/client—which is often even more work. And if you fail to keep things up to date, the docs/client get out of sync with the actual APIs and you end up in the worst of all worlds.
"Incorrect documentation is often worse than no documentation." — Bertrand Meyer
Faced with this challenge, it's easy to see why many projects forego clients and docs. But what if I told you that you could have good API documentation, and API clients, with almost no additional work?
This is the magic of API standards.
API standards
API standards are attempts to—well—standardize aspects of the API ecosystem. Much like any standard, the idea is to create a consistent way of doing something, and then an ecosystem of tools builds on top of that standard. The more people that agree to use the standard the more everyone benefits.

There are several different standards in the API world. GraphQL is an API standard that came up earlier.
In the REST world there's OpenAPI.
OpenAPI? What about CoreAPI? Or Swagger?
OpenAPI is not the only REST API standard, but it is the one that you should probably use in 2022.
If you've ever dived into the world of API documentation in Django you may have run into several other tools and acronyms. CoreAPI was the previously-recommended standard included with Django REST framework. It has since been deprecated and support for it will be removed soon. Swagger was another API-standard project, but it has been merged into OpenAPI.
In 2022, OpenAPI3 is the current winner, and it's the one we'll focus on for the rest of this post.
API standards all have similar benefits—and OpenAPI is no exception:
- They make it easy to document your APIs.
- They provide tooling that let others explore and test against your APIs.
- They help automatically generate API code for you.
Now, let's see how this all works in Django and OpenAPI3.
Your OpenAPI specification
The most important component of the ecosystem is your API specification. Here's what OpenAPI says about it:
The OpenAPI Specification (OAS) defines a standard, language-agnostic interface to HTTP APIs which allows both humans and computers to discover and understand the capabilities of the service without access to source code, documentation, or through network traffic inspection. When properly defined, a consumer can understand and interact with the remote service with a minimal amount of implementation logic.
An OpenAPI definition can then be used by documentation generation tools to display the API, code generation tools to generate servers and clients in various programming languages, testing tools, and many other use cases.
Basically, this one magic specification will produce documentation, testing tools, and can even generate API client and server code for you! Pretty remarkable stuff.
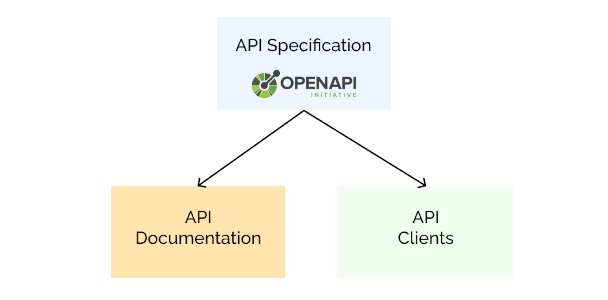
There are multiple ways you can work with API specifications. Some projects might start by creating the API specification—before writing any code. If you do things that way, you can even create your server backend automatically (the URLs and views and such—application logic still needs to be coded).
In the Django world you'd typically go the other way though—starting with your REST Framework code and generating the API specification from there.
Here's how that works.
Creating OpenAPI specifications with drf-spectacular
Going from your Django REST framework code to an OpenAPI3 specification is remarkably easy.
All it takes is a little library called drf-spectacular.
drf-spectacular provides—as its tagline suggests—sane and flexible OpenAPI 3 schema generation for Django REST framework.
Our REST Framework API
First, a quick reminder about our API.
We'll use a standard ModelViewSet based off of the same Employee data model we used in Part 4 of the guide.
This ViewSet automatically creates API views to create, list, update, and delete employees.
Check out the API section of part 4 for a deeper review.
class EmployeeViewSet(viewsets.ModelViewSet):
    queryset = Employee.objects.all()
    serializer_class = EmployeeSerializer
Setting up drf-spectacular
Now we can install drf-spectacular with pip:
pip install drf-spectacular
Then add a few lines to the settings file:
INSTALLED_APPS = [
    # your other apps here
    'drf_spectacular',
]

REST_FRAMEWORK = {
    # your other DRF settings here
    'DEFAULT_SCHEMA_CLASS': 'drf_spectacular.openapi.AutoSchema',
}
and we're good to go!
So what did we get with this?
An automatically created OpenAPI3 schema
The first thing we get is an OpenAPI3 schema file. This can be generated via a management command:
./manage.py spectacular --file schema.yml
And you can also add a URL endpoint for it that will be kept up to date as your API changes.
In your project's root urls.py add the following:
from drf_spectacular.views import SpectacularAPIView

urlpatterns = [
    # your other url patterns
    path('api/schema/', SpectacularAPIView.as_view(), name='schema'),
]
Here's a snippet from the generated schema file. It's not too important to read this closely, but you can see it has information about every endpoint, including the path, available methods, security details, and so on.
openapi: 3.0.3
info:
  title: SaaS Pegasus
  version: 0.1.0
  description: The Django-Powered SaaS Boilerplate
paths:
  /pegasus/employees/api/employees/:
    get:
      operationId: employees_list
      parameters:
      - name: page
        required: false
        in: query
        description: A page number within the paginated result set.
        schema:
          type: integer
      tags:
      - pegasus
      security:
      - cookieAuth: []
      - basicAuth: []
      - ApiKeyAuth: []
      responses:
        '200':
          content:
            application/json:
              schema:
                $ref: '#/components/schemas/PaginatedEmployeeList'
          description: ''
    post:
      operationId: employees_create
      tags:
      - pegasus
      requestBody:
        content:
          application/json:
            schema:
              $ref: '#/components/schemas/Employee'
          application/x-www-form-urlencoded:
            schema:
              $ref: '#/components/schemas/Employee'
          multipart/form-data:
            schema:
              $ref: '#/components/schemas/Employee'
        required: true
      security:
      - cookieAuth: []
      - basicAuth: []
      - ApiKeyAuth: []
      responses:
        '201':
          content:
            application/json:
              schema:
                $ref: '#/components/schemas/Employee'
          description: ''
  /pegasus/employees/api/employees/{id}/:
    get:
    # and so on...
The OpenAPI schema file isn't particularly useful on its own but it's a necessary first step. Where this starts to really pay off is when we start using it with other parts of the OpenAPI ecosystem.
Beautiful, interactive API documentation
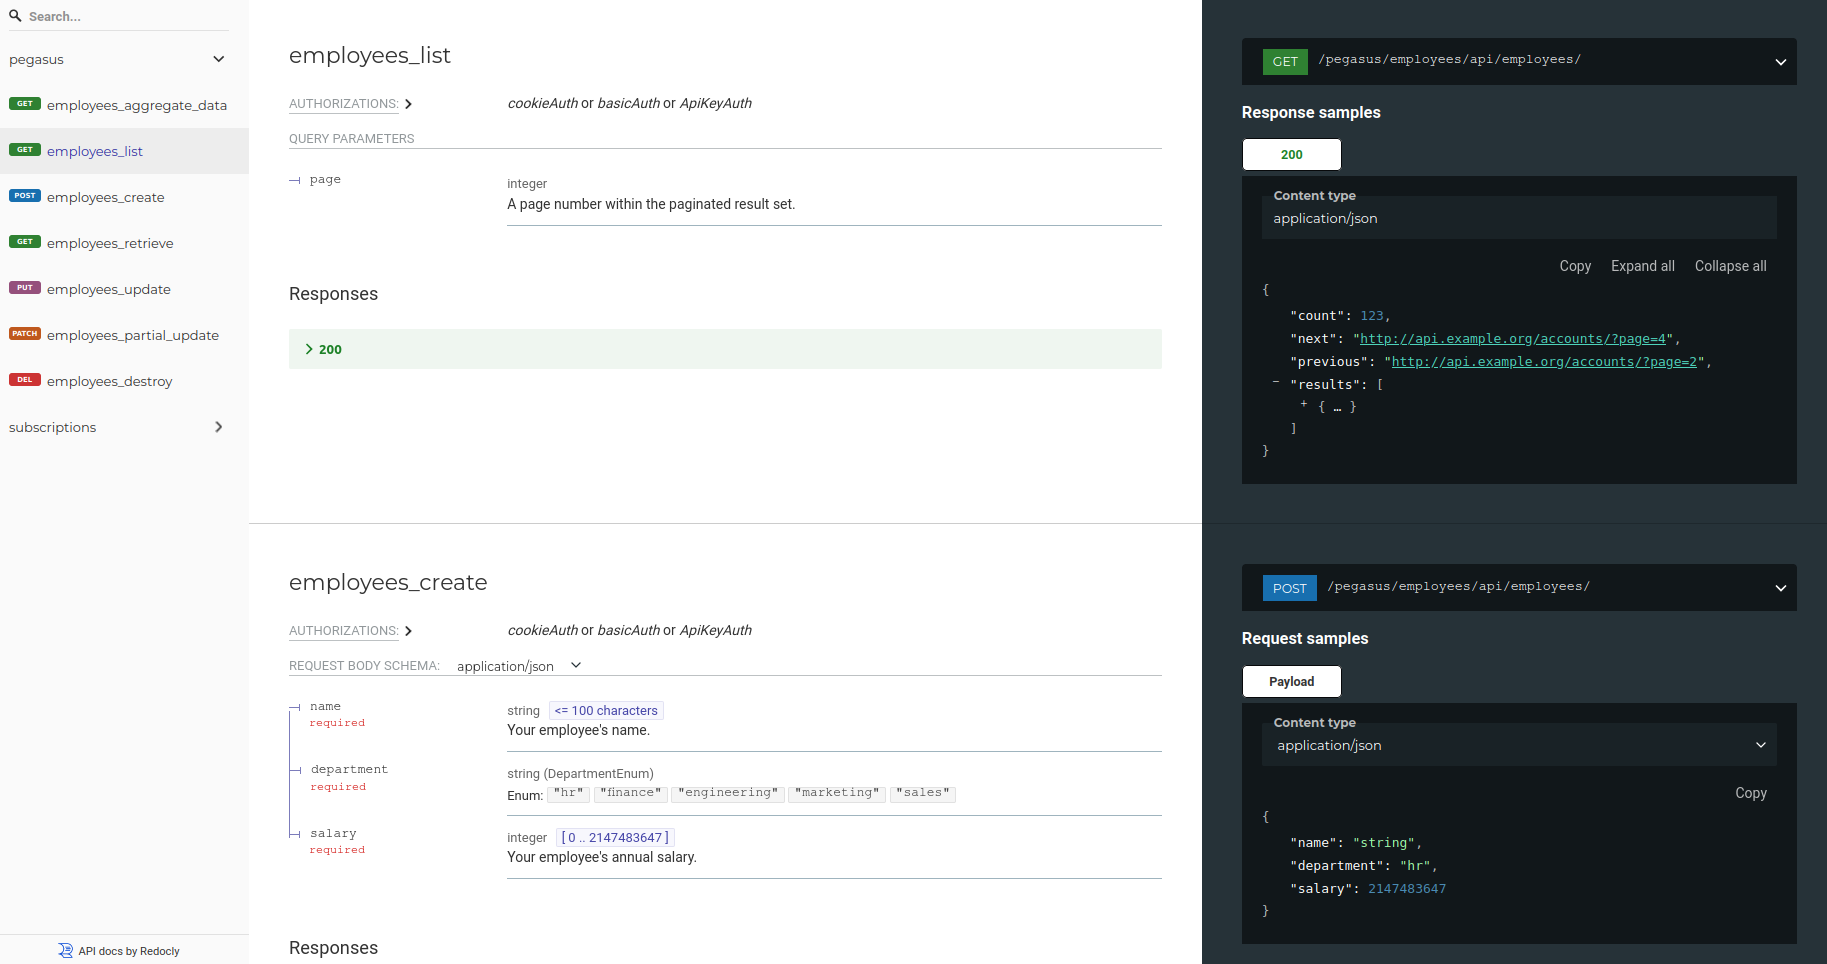
The first place that the schema shines is in the automatic creation of API documentation. There are a few tools for creating API docs from OpenAPI schemas, with the most popular ones being Redoc and Swagger UI.
Adding this documentation to your Django app is a matter of adding two more lines to your project's root urls.py:
from drf_spectacular.views import SpectacularRedocView, SpectacularSwaggerView
urlpatterns = [
    # other urls here
    # Swagger UI:
    path('api/schema/swagger-ui/', SpectacularSwaggerView.as_view(url_name='schema'), name='swagger-ui'),
    # Redoc UI:
    path('api/schema/redoc/', SpectacularRedocView.as_view(url_name='schema'), name='redoc'),
]
You can get a feel for these two flavors by viewing the API documentation for this website.
Here's the Redoc version:
And the Swagger UI version:
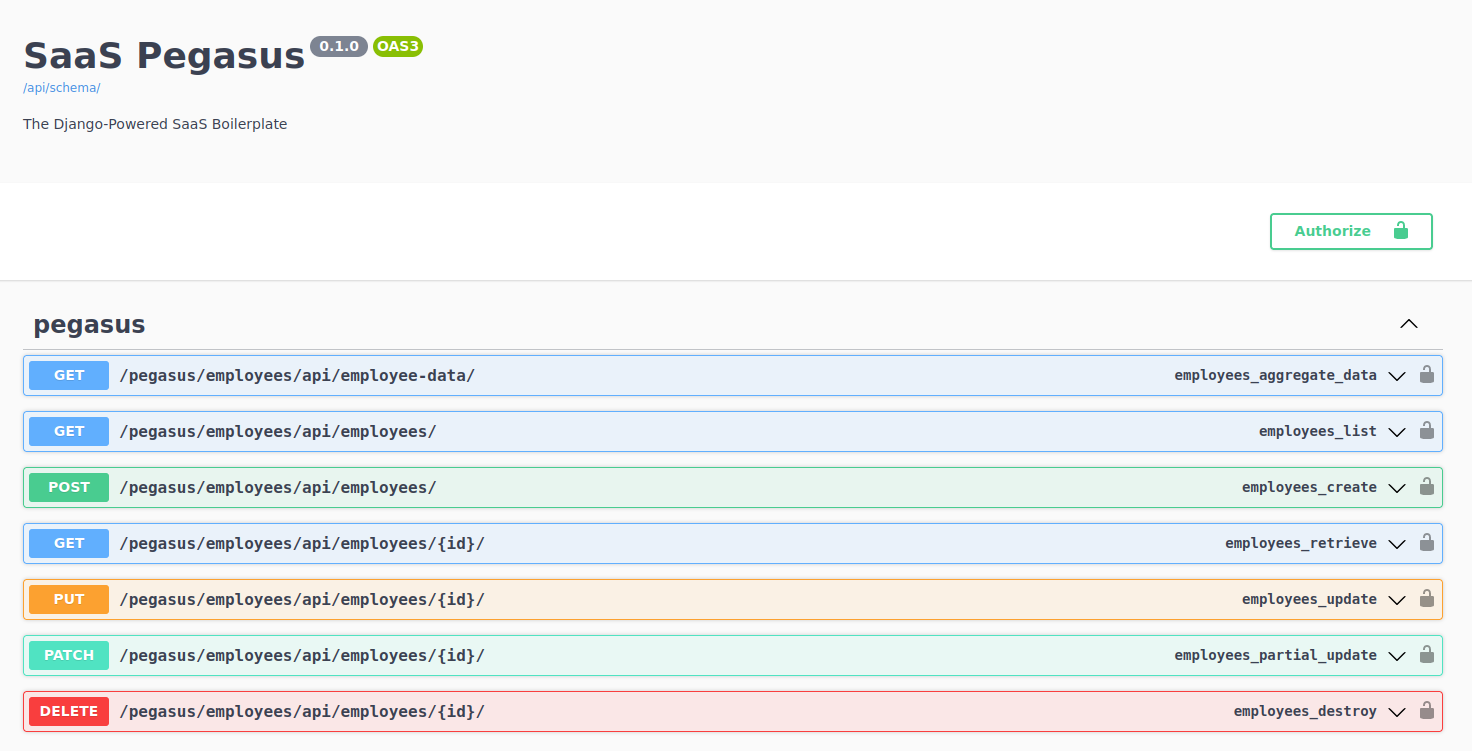
It's worth noting that not only are these clear documentation of your APIs—they are also interactive. Developers can interact with your APIs directly in the browser, even with authentication and submitting data via POST request. And as an added bonus, the documentation is always perfectly in sync with the code.
Automatically generated API clients in (almost) any language
So that solves our documentation problem. But what about API clients?
This is where the OpenAPI Generator project enters the picture. OpenAPI Generator is a remarkable library that can generate clients (and even servers!) from OpenAPI specifications. They support 60+ clients in various different languages and frameworks.
The API client generation is perhaps the biggest win of the OpenAPI ecosystem. As we already saw, API clients are super useful for internal and external APIs. They greatly simplify working with your APIs, making it faster to build against your APIs, improving code consistency, and adding better type-safety and error handling to all code that interacts with your API. And, again, they are automatically generated from your APIs themselves.
Creating API clients with OpenAPI Generator
Creating API clients is done with a single command. First you have to install OpenAPI Generator. The simplest way to do this is via npm:
npm install @openapitools/openapi-generator-cli -g
Note: you will also need to have Java installed on your system for this to work.
After installation, you can generate your new API client based on a created schema.yml file:
openapi-generator-cli generate -i schema.yml -g typescript-fetch -o ./my-api-client/
Or—from your dev server directly:
openapi-generator-cli generate -i http://localhost:8000/api/schema/ -g typescript-fetch -o ./my-api-client/
Notes:
- The
-iargument tells it where to find your schema (either a local file calledschema.ymlor at the urlhttp://localhost:8000/api/schema/. This is the same schema file/endpoint we referenced above. - The
-g typescript-fetchtells OpenAPI generate to make a typescript client based on the fetch library. You can find the complete list of client options at this list of generators. - The
-o ./my-api-client/tells OpenAPI Generator to save the client files in the./my-api-clientfolder.
Congratulations, you just created an API client!
But how do we use it?
Using your generated API client in your front end
An API client is only useful if you can actually use it. So let's walk through a real world example, using a generated API client to work with our example Employee app.
What we're building
We're going to use the same Employee example we covered in Part 4 of this guide on integrating React and Django: a basic CRUD app to manage a list of employees.
Here's the "list view" of all employees that have been added to the system:

And here's the "edit" or "details" view to create or modify an employee:

For a refresher on the Employee data model and a deeper dive on the APIs, see part 4 on integrating React and Django. To try a demo of what we're making, you'll need to create an account and then login to the demo app.
API Client Overview
The OpenAPI Generator project is fantastic, but one place it is lacking is in documentation for the API generated clients. Thankfully we can do what any developer does when faced with a project that lacks documentation: dive into the source code!
We'll cover the typescript-fetch client, which
is what I've chosen to use in my projects, and what is included with the SaaS Pegasus boilerplate.
Other clients are similar, though details will vary.
After running the openapi-generator-cli generate command against the Employee API views,
the ./my-api-client/ folder will have the following structure:
├── apis
│   ├── index.ts
│   ├── EmployeeApi.ts
├── index.ts
├── models
│   ├── DepartmentEnum.ts
│   ├── Employee.ts
│   ├── index.ts
│   ├── PaginatedEmployeeList.ts
│   ├── PatchedEmployee.ts
└── runtime.ts
The client is split out into two main areas:
- Data models for everything we will use in the clients, in
./models/ - API clients, in
./apis/
Client data models
The API generator will make data models corresponding to everything in our APIs. These are useful just like Django models are useful—they allow us to work with our API objects knowing what fields to expect and even provide validation and type-checking.
The generated models include:
- Our serialized models, which are returned from the APIs (e.g. our
Employeeobject) - Enums used by our data models (e.g.
DepartmentEnum, which represents the department dropdown) - API helper objects, e.g.
PaginatedEmployeeListfor paginating through lists of employees, andPatchedEmployeewhich is used in the methods that update (a.k.a. patch) our employee objects.
In each file there will be a TypeScript interface,
as well as utilities for converting the model to/from the API JSON.
Here's the complete source code of the generated Employee.ts as an example.
You'll note that all the fields from our Employee data model are properly typed, and even have auto-generated documentation strings!
TypeScript!? Really?!
I know it's intimidating to add a new syntax on top of the already-confusing and hard-to-keep-up-with world of modern JavaScript. But TypeScript is a useful language and a perfect fit for an API client, since it allows for strong typing to match your APIs. Also, almost all of the OpenAPI generators for JavaScript use TypeScript.
Basically, you can think of TypeScript a lot like Python type hints—a relatively lightweight extension on top of existing JavaScript that allows you to optionally add types, and provides an ecosystem around type-checking. If you have a JavaScript build pipeline set up, it's straightforward to add support, and you can call TypeScript code from normal JavaScript.
You don't need to read this code, and we won't edit it (remember, it was automatically generated for us!). But it's useful to see what's there, and the fact that it is readable is a nice bonus.
import type { DepartmentEnum } from './DepartmentEnum';
import {
    DepartmentEnumFromJSON,
    DepartmentEnumFromJSONTyped,
    DepartmentEnumToJSON,
} from './DepartmentEnum';

/**
 *
 * @export
 * @interface Employee
 */
export interface Employee {
    /**
     *
     * @type {number}
     * @memberof Employee
     */
    readonly id: number;
    /**
     *
     * @type {number}
     * @memberof Employee
     */
    readonly user: number;
    /**
     * Your employee's name.
     * @type {string}
     * @memberof Employee
     */
    name: string;
    /**
     *
     * @type {DepartmentEnum}
     * @memberof Employee
     */
    department: DepartmentEnum;
    /**
     * Your employee's annual salary.
     * @type {number}
     * @memberof Employee
     */
    salary: number;
    /**
     *
     * @type {Date}
     * @memberof Employee
     */
    readonly createdAt: Date;
    /**
     *
     * @type {Date}
     * @memberof Employee
     */
    readonly updatedAt: Date;

}

/**
 * Check if a given object implements the Employee interface.
 */
export function instanceOfEmployee(value: object): boolean {
    let isInstance = true;
    isInstance = isInstance && "id" in value;
    isInstance = isInstance && "user" in value;
    isInstance = isInstance && "name" in value;
    isInstance = isInstance && "department" in value;
    isInstance = isInstance && "salary" in value;
    isInstance = isInstance && "createdAt" in value;
    isInstance = isInstance && "updatedAt" in value;

    return isInstance;
}

export function EmployeeFromJSON(json: any): Employee {
    return EmployeeFromJSONTyped(json, false);
}

export function EmployeeFromJSONTyped(json: any, ignoreDiscriminator: boolean): Employee {
    if ((json === undefined) || (json === null)) {
        return json;
    }
    return {

        'id': json['id'],
        'user': json['user'],
        'name': json['name'],
        'department': DepartmentEnumFromJSON(json['department']),
        'salary': json['salary'],
        'createdAt': (new Date(json['created_at'])),
        'updatedAt': (new Date(json['updated_at'])),
    };
}

export function EmployeeToJSON(value?: Employee | null): any {
    if (value === undefined) {
        return undefined;
    }
    if (value === null) {
        return null;
    }
    return {

        'name': value.name,
        'department': DepartmentEnumToJSON(value.department),
        'salary': value.salary,
    };
}
Employee.ts, which contains our Employee data model.
The other generated model files will all look similar, and we'll see how to use them soon. But first we'll look at the API client.
API client
Typed data models are nice, but they aren't very useful without the actual API client. This is what's defined in the ./apis/ folder.
The generated client code is quite substantial, but importantly it will have one method you can call per available API.
So, for our standard ModelViewSet:
class EmployeeViewSet(viewsets.ModelViewSet):
    queryset = Employee.objects.all()
    serializer_class = EmployeeSerializerTypeScript
We will get individual methods for each of the 6 supported APIs (.list(), .retrieve(), .create(), .update(), .partial_update(), and .destroy()).
Here's the generated method for creating an employee:
async employeesCreate(
  requestParameters: EmployeesCreateRequest,
  initOverrides?: RequestInit | runtime.InitOverrideFunction
): Promise<Employee> {
    const response = await this.employeesCreateRaw(requestParameters, initOverrides);
    return await response.value();
}
Here you can see that the API takes in two inputs: a set of parameters (in this case, an EmployeesCreateRequest object)
and some optional overrides, and returns the Employee that was created.
Or more precisely, a Promise
of an Employee, since the API is asynchronous.
Let's look at EmployeesCreateRequest:
export interface EmployeesCreateRequest {
    employee: Employee;
}
EmployeesCreateRequest
It's an interface has one field: the employee to create.
Confused? I know it's a lot. It will be much clearer with an example.
Working with the API client
Let's now recreate the API calls for our Employee app with our new API client.
First we need to create the API client. It needs a basePath (our server address) to know where to find the API,
and we'll also provide a CSRFToken so we can use Django's CSRF protection mechanisms in our POST requests:
const apiClient = new EmployeeApi(new Configuration({
  basePath: 'https://www.saaspegasus.com/',
  headers: {
    'X-CSRFToken': Cookies.get('csrftoken'),
  }
}));
Once we have the client, we can easily call methods on it to use the APIs. For example, to list our employees we call:
apiClient.employeesList().then((result) => {
  // do something with employees here - e.g. load them into our UI
  console.log('got back employees', result.results);
});
Similarly, to create a new employee, we can call the employeesCreate function.
let employee = {
  name: 'Cory',
  department: 'Engineering',
  salary: 150000,
};
apiClient.employeesCreate({'employee': employee}).then((result) => {
  // do something with created employee here
  console.log('created employee', result);
});
In the last example you can see that while TypeScript provides a lot of information about the types of our objects, we can work with it just like regular JavaScript.
Our Employee object from above is just a JavaScript object with some of the keys that were defined on the Employee interface.
Similarly, our EmployeesCreateRequest is just another object where we stuck the employee into a field called "employee".
If we enabled strict checking and tried to pass the wrong type of data anywhere in this code we would get an error.
Improving your API clients and documentation with annotations
One problem with automatically-generated API clients is that they don't always come up with the best names for things.
In fact, if you tried to follow these instructions on your own, you would end up with API client methods that were named things like
mySiteApiEmployeesCreate and mySiteApiEmployeesList.
Not the most user-friendly!
These names come from how drf-spectactular auto-generates our OpenAPI schema.
But what if we wanted to change them?
Fortunately, drf-spectacular has an easy way to customize any of the generated properties in your API using a set of
@extend_schema decorators. These can be used to extend (or change) any of the generated properties in your schema.
In this case, the client method names are generated from the operation_id OpenAPI schema value, so we can override them
on the viewset like so:
@extend_schema_view(
    create=extend_schema(operation_id='employees_create'),
    list=extend_schema(operation_id='employees_list'),
    retrieve=extend_schema(operation_id='employees_retrieve'),
    update=extend_schema(operation_id='employees_update'),
    partial_update=extend_schema(operation_id='employees_partial_update'),
    destroy=extend_schema(operation_id='employees_destroy'),
)
class EmployeeViewSet(viewsets.ModelViewSet):
    queryset = Employee.objects.all()
    serializer_class = EmployeeSerializer
@extend_schema_view decorator to change the generated OpenAPI data.
The above will generate the nice, clean employeesCreate method names in our client.
And of course, any schema changes will also impact your generated documentation, making it smoother and easier to work with!
You can change anything in your generated schema this way, making your API docs and client exactly how you want them to be.
Wrapping up
Hopefully you now have a better idea of how you can work with Django REST framework APIs and JavaScript, and are sold on the value of OpenAPI and generated API clients! I recommend adopting these tools whenever you have substantial front-end code interacting with your Django APIs. They are useful for internal and external APIs alike.
If you have any questions, suggestions, or feedback on what you'd like to see next, I'd love to hear from you at [email protected]. And if you're looking for a way to accelerate your next Django project check out SaaS Pegasus—the Django SaaS boilerplate. It's been built with more than ten years of hard-won experience making Django apps, and should save you hundreds of hours. :)
See you next time!
