
Last updated: May, 2025

This is Part 4 of Modern JavaScript for Django Developers.
Welcome back!
In this installment we're going to build a single-page React application in a hybrid Django project. We'll cover user authentication, working with data and APIs, model manipulation, validation, URL-routing, and more.
If you haven't already, I recommend taking a quick review of the rest of the series, where we first discovered "hybrid" architectures, then selected a JavaScript build pipeline, and finally integrated it into our Django project.
So far, all we've managed to build is a few "hello world" apps—but don't worry—it's finally time to move past architecture and tooling, and get building.
Here's the complete roadmap of this installment:
- Single-page-applications in a hybrid architecture
- Choosing a JavaScript Framework
- The demo of what we'll be building
- The data model
- The 1,000-foot view
- Authentication
- Passing data from the back end to the front end
- Passing data directly with Django's template system
- Passing data with APIs
- Integrating the API data into your React app
- Saving data and working with "forms"
- Client-side URL routing
- Up next: low-JavaScript!
Ready? Let's do this!
Who is this guide for?
This guide is primarily aimed at developers with some Django familiarity who are looking to learn more about JavaScript and React. It assumes working knowledge of fundamental Django concepts like models, views and URLs.
Single-page-applications in a hybrid architecture
Recall in Part 1 we discussed how a hybrid architecture allows for multiple types of pages in the same project. Some pages—for example, a login page—might be traditional Django templates and forms, while other pages might be almost 100% JavaScript.
In this post we cover that second category of pages. Pages we dubbed client-first that are essentially single-page-applications embedded inside a Django project.
These pages—like those in a traditional client-server architecture—are almost always managed by a JavaScript framework, so that's where we'll start.
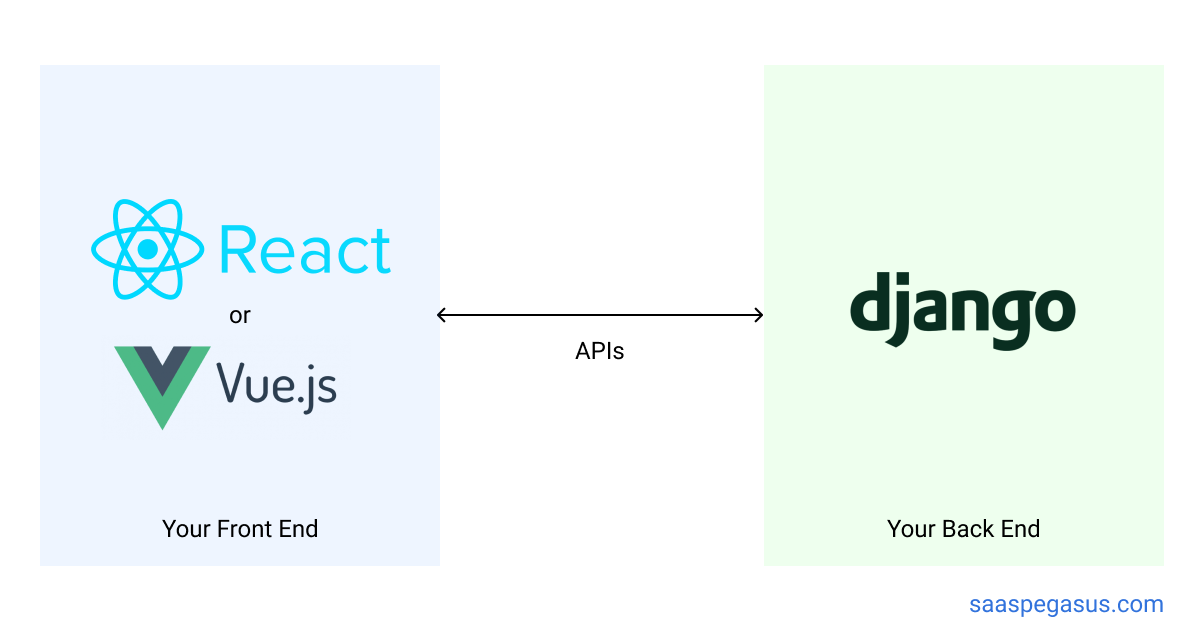
Choosing a JavaScript Framework
Our single-page-app will be built with a JavaScript framework. Don't worry, picking one is a very easy process and there aren't any opinionated people out there who'll give you conflicting advice.
Ha! Just kidding! You could literally spend months of your life agonizing over this choice and reading thousands of articles with conflicting opinions.

Thankfully—I'm not going to tell you what framework to pick. I've used a bunch and have my preferences but any of the popular ones out there (i.e. React, Vue, Angular, etc.) can get the job done. If you already know and like one, just use that.
Having said that, if I had to distill my own feelings into one sentence it would be: go with React or Vue—React is better long term, but Vue's better for beginners. I'm sure the Svelte people out there are already getting their pitchforks ready.
Still—because this is a post about JavaScript and we need lots of example code—I had to pick one. So I chose React. That's not an endorsement—it's just the one I know best. All of the theory in this post is framework-agnostic but the JavaScript implementations will use React.
With that out of the way we can get on to the examples.
Vue developer?
The majority of this guide is relevant to integrating Django with any front-end framework—React is just used as an illustrative example. Still—if you'd be interested in seeing this content for Vue (or another framework) let me know by sending a mail to [email protected].
The demo of what we'll be building
This article will go through building a single-page application that lets you create, update and delete "employee" records.
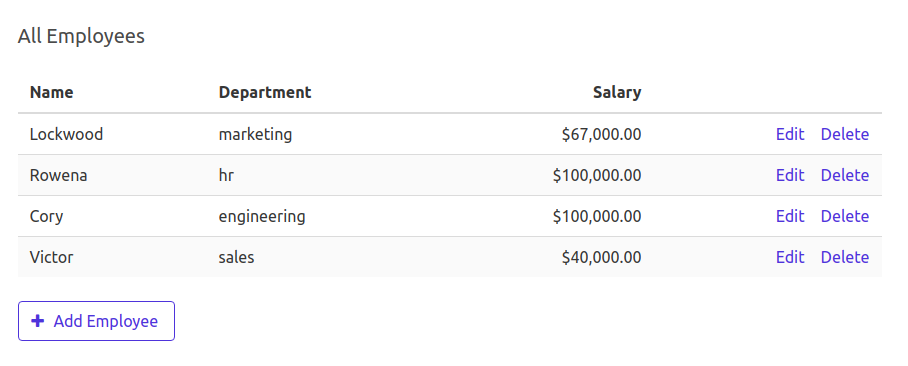
Here's the "list view" of all employees that have been added to the system:
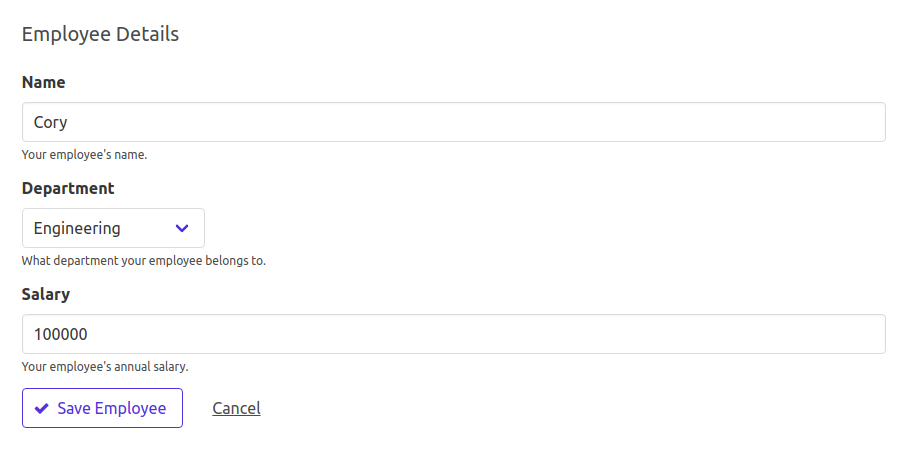
And here's the "edit" or "details" view to create or modify an employee:
On top of the basic functionality, the app also scopes the data to the logged-in user, and includes client-side URL routing and validation.
If you want to try the demo you'll need to create an account and then login to the demo app. From there you can create some employees and see how the demo responds. Go ahead and do that now—we'll be here waiting when you're done.
If you're wondering why the demo requires creating an account—it's because we want to cover authentication and how to scope the data to a single user account as part of the set up.
Got your head wrapped around the demo? Great!
Time to look under the hood.
The data model
Here's the Django model we'll be working with: an Employee with the properties you saw in the UI.
class Employee(models.Model):
    DEPARTMENT_CHOICES = (
        ('hr', 'Human Resources'),
        ('finance', 'Finance'),
        ('engineering', 'Engineering'),
        ('marketing', 'Marketing'),
        ('sales', 'Sales'),
    )
    user = models.ForeignKey(settings.AUTH_USER_MODEL, on_delete=models.CASCADE,
                             related_name='employees')
    name = models.CharField(max_length=100)
    department = models.CharField(max_length=20, choices=DEPARTMENT_CHOICES)
    salary = models.PositiveIntegerField()
Employee Django model.
In addition to our normal model and field definitions,
we also associate every Employee with a Django User object.
This is a prerequisite to allowing each user to manage their own unique set of employees after logging in—the
reason that you only see employees that you have added in the demo.
We'll see how this is done in later sections.
The 1,000-foot view
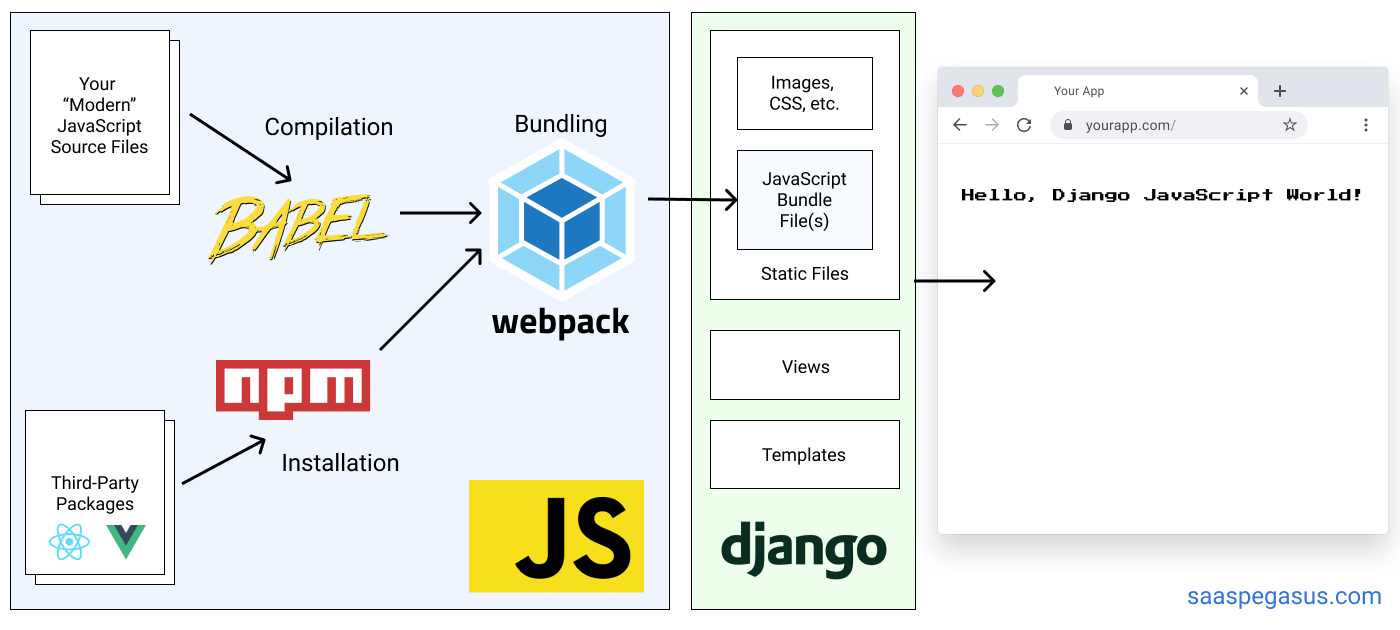
At a high level, the structure of these pages—which we covered in depth in Part 3—should be familiar to most Django developers.
We use a normal Django view to render a normal Django template. However, that template is just a skeleton HTML file with a component that is fully controlled by our JavaScript framework. The JavaScript code is compiled and managed separately, and included as a compiled bundle on the page.
The code for our template—which is served by a normal Django view—looks like this:
{% extends "myapp/base_template.html" %}
{% block content %}
  <!-- div that the JavaScript framework will render in -->
  <div id="js-framework-home"></div>
  <!-- bundle file with our JavaScript application logic -->
  <script src="{% static 'js-bundle.js' %}"></script>
{% endblock content %}
And then, separately, in our JavaScript codebase, we mount our React app using the "js-framework-home" div id
from the template.
import React from 'react';
import ReactDOM from "react-dom";
import EmployeeApplication from "./App";

ReactDOM.render(
  // Our main React application component, which we've imported from another file
  <EmployeeApplication />,
  // Gets rendered to the <div> we defined in our Django template using the shared id
  document.getElementById('js-framework-home')
);
js-bundle.js.
Refer back to Part 3 if this doesn't make sense—or for the gory details on how to set it all up.
Where to add your scripts?
In the above example we include our bundle script at the bottom of the template, just before the end of the </body> tag. You can also put them in the <head> tag, using the defer keyword, which may lead to slightly improved performance. A good write up on the async and defer attributes can be found here.
Authentication
One of the first things that comes up in a Django/JavaScript project is how to handle authentication—protecting your data and APIs behind a login.
Here there's some good news: since we chose a hybrid architecture, this is pretty easy!
Because we're serving our pages directly from Django we can just use all of Django's built-in tooling to handle authentication and not rely on complex third-party authentication workflows.
That means we can just use the @login_required decorator
or LoginRequiredMixin on the
hybrid Django view serving our template and Django handles the rest.
No wrestling with CORS or 3rd-party authentication frameworks is necessary.
Hooray!
Passing data from the back end to the front end
Another thing almost every app needs to do is send data from the back end to the front end. Data most often comes from the database—for example, the list of employees in the demo app—although can also be statically defined—which we'll see in a moment.
In a hybrid architecture there are two mechanisms to send data to the front end:
- Pass the data directly to the template, using Django's built-in templating system.
- Provide the data via asynchronous APIs, using JavaScript and Django REST framework (DRF).
We'll cover both of these options, and when you might choose one over the other.
Passing data directly with Django's template system
Passing the data directly into the template is the simplest way to get data from your back end to your front end, and, for small amounts of data it can work great.
In the demo application, this technique is used to pass the list of available department choices to the front end—which are then used to populate the dropdown on the "edit employee" screen. Statically-defined data like our department set is usually a good candidate to be passed directly to the template.
Now, we could build out an entire API for the department choices—but that introduces a lot of overhead for what is essentially a small list that never changes. Likewise, we could just hard-code the options in the front-end code, but then we're duplicating the logic in JavaScript and Django (where it resides on the model), which violates the don't repeat yourself (DRY) principle. Every time we add or a change a choice we'll have to remember to update it in two places.
So, instead we just pass it right in from the Django view.
The ability to pass data directly from Django to the front end is one major benefit of the hybrid architecture. In a client-server architecture you have to either create additional APIs or repeat logic in the back end and front end.
Here are the steps to the approach:
- In the Django view that serves our application we get the data we need.
- We pass it to the template in a way that can be serialized as JSON.
- We load the JSON into JavaScript and make it available to the front end.
For the employee department example, first in views.py we get the data and serialize it as JSON via
the template context.
Here's the complete view, which also handles our authentication via the login_required decorator.
# make sure this view is only accessible on login
@method_decorator(login_required, name='dispatch')
class EmployeeView(TemplateView):
    # our hybrid template, shown above
    template_name = 'myapp/employee_home.html'

    def get_context_data(self, **kwargs):
        # passing the department choices to the template in the context
        return {
            'department_choices': [{
                'id': c[0],
                'name': c[1]
            } for c in Employee.DEPARTMENT_CHOICES],
        }
Employee model to the template
as JSON.
Next, in the template, we can use Django's handy json_script template tag
to serialize this data in a way that's easy to pass to JavaScript.
{% extends "myapp/base_template.html" %}
{% block content %}
  <div id="js-framework-home"></div>
  <!-- making the department_choices variable avialable in the DOM -->
  {{ department_choices|json_script:'department-choices' }}
  <script src="{% static 'js-bundle.js' %}"></script>
{% endblock content %}
department_choices variable to JSON using the json_script template tag.
Note that the variable needs to be defined before being used (i.e. before js-bundle.js is imported).
The json_script tag generates the following HTML in the rendered template:
<script id="department-choices" type="application/json">
  [{"id": "hr", "name": "Human Resources"}, {"id": "finance", "name": "Finance"}, ...
</script>
json_script.
Which then, in JavaScript, can be pulled out into a variable using standard DOM manipulation:
const DEPARTMENT_CHOICES = JSON.parse(document.getElementById('department-choices').textContent);
// do other stuff with DEPARTMENT_CHOICES here - e.g. populate the dropdown
This method works great—especially for things like static data that you keep in Python but don't want to build out an entire API for.
It does still require some coupling between your front end code and back end (in the form of the DEPARTMENT_CHOICES global variable
or 'department-choices' DOM id), but the simplicity gained is well worth it.
Passing data with APIs
Passing data directly to the template is nice and simple, but it's not great for all scenarios.
One problem is that the more data you load in the view, the slower your initial page render time will be, and the more content you'll have to send to the browser. This hurts the performance and usability of your site.
A related problem is that anything dynamic on the page will need to have all possible data available. So for anything that does filtering, pagination, search etc. you would have to load your entire data set into JavaScript, then do that stuff in the browser. For any application with non-trivial amounts of data that's usually not a good plan.
In these scenarios the best bet is to instead provide the data via APIs. You load the page without any data (or optionally with a small subset to start), and then use JavaScript to fetch the data after the page loads—or on some user action.
An API-based approach will make the page feel snappier on initial load, and allows you to only fetch the data you need when you need it. API-based architectures can support things like search, filter, and infinite scroll by pushing the filtering logic to the back end, where it can be handled far more efficiently.
In the demo app, we'll use the API-based approach to pass our employee data to the front end. There are quite a few moving parts, so we'll cover them step-by-step.
Creating the API in Django REST framework
First we need to create our API. This will be a URL our front end can hit that serves—and later allows us to update—our employee data. We'll use Django REST framework for this, since it's by far the most popular and widely-supported library for making APIs in Django.
Technically you don't have to use Django REST framework for your APIs. There are other API libraries for Django—including another popular one called django-ninja. Or you can even roll your own API layer! That said, Django REST framework is so ubiquitous and fully-featured it is usually a good default choice.
To create our API we'll first define a Serializer
class for the Employee model.
The serializer defines how the model is translated into JSON.
Django REST framework provides a helpful ModelSerializer class that handles most of the heavy lifting.
from rest_framework import serializers
from .models import Employee

class EmployeeSerializer(serializers.ModelSerializer):
    user = serializers.PrimaryKeyRelatedField(
        read_only=True,
        default=serializers.CurrentUserDefault()
    )
    department = serializers.ChoiceField(choices=Employee.DEPARTMENT_CHOICES)

    class Meta:
        model = Employee
        fields = ('id', 'user', 'name', 'department', 'salary')
Employee objects
The above serializer also makes the user property a read-only field that defaults to the logged-in user (when saved),
and adds choice validation to the department field.
It translates an Employee object into something like this:
{
    "id": 25,
    "user": 1,
    "name": "Cory",
    "department": "engineering",
    "salary": 100000,
}
Employee
Once we've defined the serializer, we can use REST framework's ModelViewSet class
to create the view in views.py.
The only noteworthy change is to filter the available employees based on the request.user property—which
ensures that logged in users only see the Employee objects that they've created.
class EmployeeViewSet(viewsets.ModelViewSet):
    serializer_class = EmployeeSerializer

    def get_queryset(self):
        # filter queryset based on logged in user
        return self.request.user.employees.all()

    def perform_create(self, serializer):
        # ensure current user is correctly populated on new objects
        serializer.save(user=self.request.user)
Finally, we can serve the viewset in our urls.py:
from rest_framework import routers
from . import views

urlpatterns = [
    # other urls here
]

router = routers.DefaultRouter()
router.register('api/employees', views.EmployeeViewSet)

urlpatterns += router.urls
Once you've stitched these three things together, you should be able to load http://localhost:8000/api/employee-data/—or
wherever you put the route—and see any Employee objects associated with the logged-in user.
Our API is complete!
Getting API data into your front-end code
Once you've got your APIs built, it's time to use them in the front end.
Like most things in coding—and especially in JavaScript—there's no single right way to do this. However, most projects will take one of two approaches.
- Use an HTTP API. The fetch API is a good option that's natively supported in most browsers, though there's also axios, jQuery and plenty of other libraries that do the same thing.
- Use an API client. These days, probably using OpenAPI. This approach is covered in depth in Part 6 of this guide: Django and OpenAPI: Front end the better way.
Which of these approaches should you take?
It's kind of up to you and there's tradeoffs to both.
The HTTP approach lets you work directly with the APIs and gives you fine-grained control over how you handle the requests and responses. They are also easier to reason with and debug. But, you might end up having to do a lot of boilerplate work to abstract API calls to meaningful functions with clear signatures—especially when going beyond just reading data out of the APIs.
Conversely, using an API client does a lot of the heavy-lifting for you and provides a clean interface to work with your APIs right out of the box. But, it can be more difficult to configure, and to troubleshoot when things go wrong.
At the end of the day, both are pretty similar, as evidenced by the two equivalent code samples below.
fetch('/api/employees/')
  .then(res => res.json())
  .then(
    (result) => {
      // whatever you want to do with the list of employees will happen here
      handleEmployeeLoadSuccess(result);
    },
    (error) => {
      handleEmployeeLoadFailed(error);  // error handling
    }
  );
}
fetch API.
The API is loaded by URL and authentication is handled without configuration
by the Django session cookie—an advantage of the hybrid architecture.
const apiClient = new EmployeeApi(new Configuration({
  basePath: 'https://www.saaspegasus.com/',
  headers: {
    'X-CSRFToken': Cookies.get('csrftoken'),
  }
}));
apiClient.employeesList().then((result) => {
  // do something with employees here - e.g. load them into our UI
  handleEmployeeLoadSuccess(result.results);
}).catch((error) => {
  handleEmployeeLoadFailed(error);  // error handling
});
What's with those arrows?
Here and in other JavaScript examples we'll use ES6 syntax, including arrow functions (the "=>" syntax). If you're not familiar with them, take a quick look at those two links. We can use ES6 without worry because we set up a build pipeline to compile our code into JavaScript that all browsers can handle. Refer to parts 2 and 3 of the guide for more details on the JavaScript build process.If you're starting from scratch, this guide recommends starting with an OpenAPI client—and only switching to something else
if it doesn't work for you.
However, if your project is already using a different pattern or you already prefer fetch, axios, or some other
library then use that. Bottom line: it doesn't really matter as long as it works for you.
The rest of the examples in the guide will use the OpenAPI client for simplicity.
There are several steps you have to generate and use the OpenAPI client. These are all outlined in depth in Part 6 of this guide on OpenAPI and Django.
API URLs
In the fetch example above we hard-coded the /api/employees/ URL in our JavaScript code.
In practice, this is likely fine as it's rare that those URLs would change. But, it does violate our "don't repeat yourself" philosophy and introduces another way for something to unexpectedly break if URLs ever change.
A simple way to avoid declaring URLs in multiple places is to initialize them as static data in the template.
Since we're using a hybrid application we can do this with the existing
{% url %} template tag.
const URLS = {
  LIST_EMPLOYEES: '{% url 'employees:employee-list' %}',
};
Then we can replace our fetch call with:
fetch(URLS.LIST_EMPLOYEES)
and we can freely change our URLs without having to change any front-end code.
If you use the OpenAPI client, this is handled for you automatically.
Integrating the API data into your React app
Okay, so now we know how to get the data out of our APIs. What do we do once we have it?
In a React app you'd probably set the list of Employees into your component's state—and then use that to render the data.
A complete example using React hooks—including
dealing with the loading state—looks like this.
This can be stored in a file named App.js alongside the entry point defined above.
const EmployeeApplication = function(props) {
  // State variable to show whether we're loading data or not.
  // Defaults to "true" to show a loading screen until we get our data from the API
  const [isLoading, setIsLoading] = useState(true);
  // State variable where we'll save our list of employees
  const [employees, setEmployees] = useState([]);

  // API client needs to be initialized as per above and passed
  // to the component
  const client = props.client;

  // This effect will be called when the component mounts and fetch the data
  // from our API
  useEffect(
    () => {
      client.employeesList().then((result) => {
        // when we get the data back we set it in our state variable
        setEmployees(result.results);
        // and unset the "loading" flag
        setIsLoading(false);
      });
    },
    [], // this argument will prevent continually hitting the APIs on state changes.
  );

  // Show a loading state if we haven't gotten data back yet
  if (isLoading) {
    return <p>Employee data is loading...</p>;
  }
  // Show an "empty" state if we have no employees
  if (employees.length === 0) {
    return <p>No employees found!</p>;
  } else {
    // Show our employee list component with the data we got back
    return <EmployeeList employees={employees} />;
  }
}

const EmployeeList = function(props) {
  // This component renders a table of employees
  return (
    <table>
      <thead>
        <tr>
          <th>Name</th>
          <th>Department</th>
          <th>Salary</th>
        </tr>
      </thead>
      <tbody>
        {
          props.employees.map((employee, index) => {
            return (
              <tr key={index}>
                <td>{employee.name}</td>
                <td>{employee.department}</td>
                <td>{employee.salary}</td>
               </tr>
            );
          })
        }
        </tbody>
    </table>
  );
};
Saving data and working with "forms"
Ok we've got our employee list view working. Next we need to support creating (and editing) employees.
Here the API client really shines, as it makes these operations very straightforward.
All we have to do is call the employeesCreate function and we're good to go!
All of the logic of PUT vs POST and what parameters go where is handled by the client.
Here's the code to create a new Employee with OpenAPI:
const employee = {
  name: "Cory",
  department: "engineering",
  salary: 100000,
};
// Here we're calling employeesCreate instead of employeesList, and additionally
// pass in the data we want to use. The rest is the same as above.
client.employeesCreate({"employee": employee}).then((result) => {
  handleEmployeeCreateSuccess(result);
}).catch((error) => {
  handleEmployeeCreateFailed(error);
});
And here's the code to update an existing Employee—say by giving them a 10% raise:
const employee = {
  id: 1,  // this should match the Django id of the employee to change
  salary: 110000,
};
// The method for updating an employee is 'employeesPartialUpdate'
client.employeesPartialUpdate({'employee': employee}).then((result) => {
  handleEmployeeUpdateSuccess(result);
}).catch((error) => {
  handleEmployeeUpdateFailed(error);
});
You might be wondering where these "employeesList", "employeesCreate" and "employeesPartialUpdate" methods come from. They are automatically generated as part of the API schema, which can be automatically generated by REST framework or drf-spectacular. This is explained in much more depth in Part 6.
Connecting form data to a React component
In practice you wouldn't hard-code the employee data, but would have it managed by a React UI component.
In React you would define UI controls that are bound to local state variables, and then you would hit the create (or update) employee API when the save button is clicked.
That looks something like this:
const AddEmployeeWidget = function(props) {
  // Our API client, passed in as a property again.
  const client = props.client;
  // State variables for each of the fields we'll allow you to set on the employee
  const [name, setName] = useState(props.name || '');
  const [department, setDepartment] = useState(props.department || '');
  const [salary, setSalary] = useState(props.salary || '');

  // The function that gets called when we create our new employee
  const saveEmployee = function() {
    // Construct the employee JSON from our state variables
    let employee = {
      name: name,
      department: department,
      salary: salary,
    };
    client.employeesCreate({"employee": employee}).then((result) => {
      // This is a callback we've added so that the parent component can deal with new employees
      // e.g. to add them to the EmployeeList.
      props.employeeSaved(result);
    });
  };

  return (
    <section>
      <label>Name</label>
      <input type="text" placeholder="Michael Scott"
             onChange={(event) => setName(event.target.value)} value={name}>
      </input>
      <label>Department</label>
      <select onChange={(event) => setDepartment(event.target.value)} value={department}>
         {DEPARTMENT_CHOICES.map(
           (department, i) => <option key={i} value={department.id}>{department.name}</option>
          )}
      </select>
      <input type="number" placeholder="50000"
             onChange={(event) => setSalary(event.target.value)} value={salary}>
      </input>
      <button type='button' onClick={() => saveEmployee()}>
          Add Employee
      </button>
    </section>
  );
};
One thing to call attention to in the above example is that we finally got around to using the DEPARTMENT_CHOICES
variable that we defined in our template earlier.
This shows how that process can be leveraged to connect back-end data to your front-end code.
And we didn't have to duplicate the data anywhere!
Handling validation in our React application
One nice feature that comes out-of-the-box with Django forms is built-in validation—making sure the required fields are set and have allowed values. In a single-page-app—since we're not using Django forms—we have to handle this ourselves.
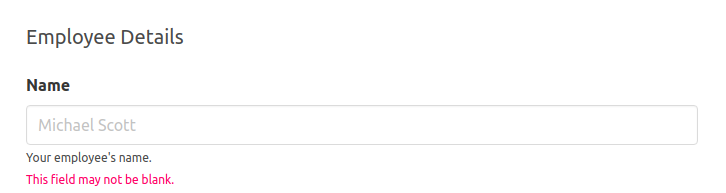
Thankfully, most of the pieces are already in place for this in Django REST framework and OpenAPI.
Your Serializer class will automatically handle any model-level validation for you
and respond to invalid requests with a 400 HTTP response code.
The body of an invalid response will look like the below—a JSON dictionary where
the keys are field names and the values are lists of validation errors associated with that field.
{
  "name": [
    "This field may not be blank."
  ],
  "salary": [
    "A valid integer is required."
  ]
}
To use this data in our UI we'll first need a new state variable to store it:
const [errors, setErrors] = useState({});
Then we need to add an error handling block to set the errors in our API request.
client.employeesCreate({"employee": employee}).then((result) => {
  props.employeeSaved(result);
}).catch((error) => {
  // This block will save any API errors to our new state variable
  setErrors(error.content);
});
And finally we need to check for any errors and render them alongside our UI component.
Here's the updated version for the name field.
<label>Name</label>
<input type="text" placeholder="Michael Scott"
     onChange={(event) => setName(event.target.value)} value={name}>
</input>
{
  // Show any errors associated with the "name" field
  errors.name.map((error, i) => {
    return <span className="error" key={i}>{error}</span>
  })
}
And voilà! Client-side validation!
Client-side URL routing
In a traditional web application, every action and link triggers a new page load to a new URL—a foundational principle of HTTP and the Internet. By default, this is how Django applications behave.
But, in a single-page application, actions are taken directly in the browser with no full-page reloads—and all the communication with the server happens via hidden, asynchronous requests. Thus, in order to support linkable URLs and the browser's back button, the front-end code must programmatically change the browser's URL as it manipulates the page. This is called client-side (or front-end) URL routing.
Client-side URL routing is an important part of making single-page-applications more usable on the web. In the demo app, imagine if you tried sharing a link to edit a specific employee, but when it was opened it just loaded the employee list. That would be super confusing and frustrating! This issue was all over the Internet in the early days of single-page-applications, before client-side URL support became the norm.

Unfortunately, front-end applications—by default—do not include any logic to handle URLs. And URL routing can get even more convoluted in a hybrid application, since Django has its own URL-routing system which JavaScript then layers its own thing on top of.
Thankfully, dealing with URLs in a hybrid architecture is straightforward once you plan for it, and all the heavy lifting happens on the front end.
The steps to handling client-side URL routing in a hybrid application are:
- In the back end, route all paths below the base URL to the front end.
- Build URL-route handling into your front end, using your framework's tool of choice.
If you set this up properly, it should just work.
Handling URL routing on the back end
Since the client is handling all the heavy lifting, the server side of the setup is easy.
All that's needed is to add the following to your urls.py:
urlpatterns = [
    # this route catches the "naked" URL with no path specified. you can link to it in most places
    path(r'my-react-page/', views.MyReactView.as_view(), name='react_app'),

    # this route catches any url below the main one, so the path can be passed to the front end
    path(r'my-react-page/<path:path>', views.MyReactView.as_view(), name='react_app_with_path'),
]
The only other caveat is to make sure your view can take in the appropriate argument.
Class-based views will do this out of the box via the **kwargs argument, and function-based views
can do it with a default parameter:
class MyReactView(TemplateView):
    template_name = 'react_app.html'

    def get_context_data(self, **kwargs):
        return {'context_variable': 'value'}
def my_view(request, path=''):
    return render('react_app.html', context={'context_variable': 'value'})
One thing worth pointing out is that Django doesn't do anything with the path at all! You don't even need to pass it to the template. That's because the JavaScript frameworks have their own way of extracting the path directly from the browser.
Handling URL routing on the front end
As we mentioned—the front end is where all the actual work of URL routing will happen. Handling URLs on the front end means using whatever front-end URL tool you want. In practice, this typically means using the library recommended by your front-end framework.
For React this means using React Router, while for Vue it would mean using Vue Router.
These tools can be used mostly out of the box.
One small caveat is that you may need to initialize them with a base path.
In React you should use the basename property,
and in Vue it's the base option.
<Router basename='/my-react-page/'>
  <Switch>
    <Route path="/about">
      <About />
    </Route>
    <Route path="/users">
      <Users />
    </Route>
    <Route path="/">
      <Home />
    </Route>
  </Switch>
</Router>
basename property to the Router.
In the above set up, the /my-react-page/ URL would map to the <Home> component,
/my-react-page/about would map to <About> and so on.
After you've initialized the base path, you can set up URL routing using all the standard React Router tools. The React Router tutorial and documentation is a great place to get started for more information on this.
You can find the complete source code of this example—including routing—in SaaS Pegasus—the boilerplate for launching your Django app fast. Pegasus is built by the author of this series and comes with fully-working React, Vue, and HTMX example apps, as well as loads of other code to help you learn best practices and launch a production Django application.
Up next: low-JavaScript!
A lot changed in the year between when this article was first written and when I got around to the next installment.
In that year I discovered a few technologies that caused me to rethink the entire Django/JavaScript world. In short: you might not even need JavaScript anymore.
To see what that looks like, check out Part 5: Django, HTMX and Alpine.js: Modern websites, JavaScript optional.
Thanks for reading, and I hope it's been helpful! If you read this and enjoyed it (or hated it) I'd love to hear from you at [email protected].