
Published: November 24, 2025

This is Part 3 of Modern JavaScript for Django Developers.
Welcome to Part 3!
In case you missed it—in Part 1 we covered how to organize a JavaScript codebase inside a Django project, and in Part 2 we provided a crash course in JavaScript tooling.
And now we finally start getting to the payoff: integrating a modern JavaScript pipeline into our Django project.
In this part we'll finally stop with the theory, roll up our sleeves, and start getting building! By the end of this guide we'll have a React app and a Tailwind CSS pipeline running happily in a Django project.
Sound good? Let's get into it!
This version of Part 3 was written in late 2025 to use Vite—the modern JavaScript build tool that is the recommended choice for projects today. If you're interested in the previous, Webpack-based version, you can find the old Part 3 here.
You can also find a video walkthrough of this guide by the author on YouTube.
How JavaScript and Django will integrate
Let's start with the big picture setup.
Basically, we're going to create the JavaScript pipeline we covered in Part 2 as a standalone, separate environment inside our Django project.
Then to integrate with Django, the outputs (remember those bundle files?) will be static files that we'll drop into our templates wherever we need them. This will allow us to create anything from single-page apps, to reusable JavaScript libraries while maintaining the best of Django and JavaScript tooling.
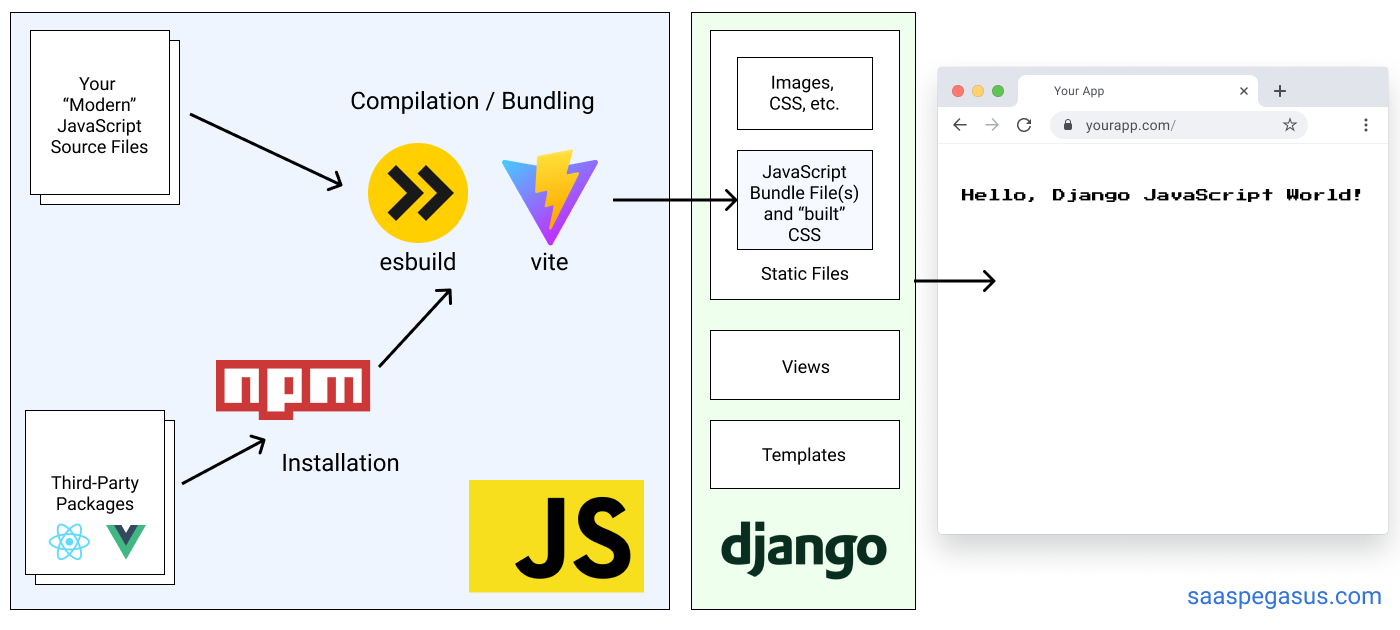
Hopefully this makes sense, but if it doesn't, we'll get there through some concrete examples.
Laying out your project
Ok, first the basics: where to put stuff.
At a high level, we suggest making your JavaScript project a subfolder in the root of your larger Django project.
This guide uses a folder called ./assets/ for the front-end source files, though you could also use
./front-end/, ./js/ or whatever you want really.
The JavaScript project is where you'll do your front-end development—but remember Django will only work with the outputs
generated by the bundler.
So in addition to our ./assets/ directory, we'll also dump the outputs somewhere that Django's
static files system can find them.
A good default for this is an appropriately named root-level ./static/ folder.
Here's how that structure might look for a basic project modeled off the Django tutorial and SaaS Pegasus (a Django SaaS starter kit built by the author if this guide).
├── manage.py
├── mysite
│   ├── __init__.py
│   ├── settings.py
│   ├── urls.py
│   └── wsgi.py
├── myapp      <----- a normal Django app
│   ├── __init__.py
│   ├── models.py
│   ├── urls.py
│   └── views.py
├── assets     <----- our front-end project source
│   ├── javascript
│   └── styles
├── static     <----- our front-end project outputs (and other Django static files)
│   ├── css
│   ├── images
│   └── js
└── templates  <----- our Django template files
    └── myapp
Hopefully the above layout makes sense. One note about the above layout is that it puts all Django templates in a standalone folder, as recommended by Two Scoops of Django.
The main folders we'll be talking about for the purposes of this guide are assets and static.
There is also an open-source companion repository to this guide with all the code we go through. You can find that on Github here: Django + Vite + Tailwind CSS Starter.
Setting up Vite inside your Django project
In part 2 we covered how we'll use Vite to bundle up our JavaScript source files into a file we can use in our Django templates.
![]()
Now that we've got our project structure, we can set Vite up to do what we want—namely,
build the stuff in ./assets/ and drop the bundles into ./static/.
We'll cover how to create page-level bundles later, but for now let's just assume that we'll
bundle our entire front-end into one giant file called index-bundle.js.
To start, we'll be following along with the basics from the Vite getting started guide.
If you haven't already, you'll need to install npm before continuing.
First initialize a new npm project in the root of your Django project and install Vite.
npm init -y
npm install -D vite
This will create package.json and package-lock.json files as well as a node_modules folder where our JavaScript
library dependencies will go.
The first two should be maintained by your version control system, while the latter should be ignored.
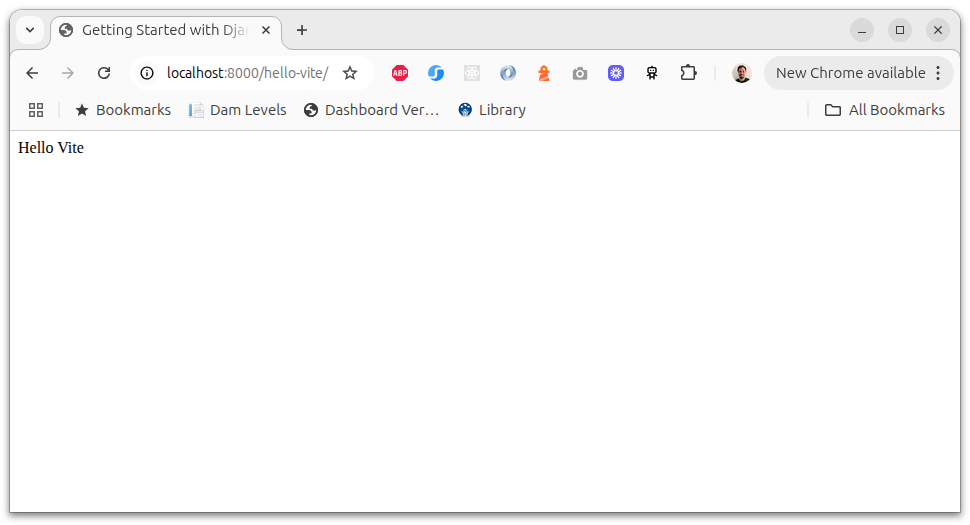
Next create a file called ./assets/index.js and give it these contents:
function component() {
  const element = document.createElement('div');
  element.innerHTML = 'Hello Vite';
  return element;
}
document.body.appendChild(component());
This will be our "hello world" set up to confirm that everything is working.
Our next step will be to create a Vite config file.
Create vite.config.js in the root of your Django project, and give it these contents.
We won't cover the details of this file in detail, but reading through the comments should help with
the most relevant parts:
import { defineConfig } from 'vite';
import path from 'path';

export default defineConfig({
  base: '/static/', // This should match Django's settings.STATIC_URL
  build: {
    // Where Vite will save its output files.
    // This should be something in your settings.STATICFILES_DIRS
    outDir: path.resolve(__dirname, './static'),
    emptyOutDir: false, // Preserve the outDir to not clobber Django's other files.
    manifest: "manifest.json",
    rollupOptions: {
      input: {
        'index': path.resolve(__dirname, './assets/index.js'),
      },
      output: {
        // Output JS bundles to js/ directory with -bundle suffix
        entryFileNames: `js/[name]-bundle.js`,
      },
    },
  },
});
vite.config.js file.Finally, we'll add an npm script target to run vite.
In package.json add the following line to the scripts key:
  "scripts": {
    (other stuff here)
    "build": "vite build"
  },
package.json.Now we run npm run build to execute our vite script. If all goes well you should see an output like this
and your ./static/js/index-bundle.js file should be created!
$ npm run build

> [email protected] build
> vite build

vite v7.1.12 building for production...
✓ 1 modules transformed.
static/js/index-bundle.js  0.12 kB │ gzip: 0.13 kB
✓ built in 40ms
Congrats! You now have a JavaScript pipeline!
Connecting your vite bundles to Django
Now all that's left to do is to drop our bundle file in any Django template as a normal static file. This is all standard Django 101, but for completeness, let's show how that's done.
The template (let's call it hello_vite.html) will look something like this:
{% load static %}
<html>
  <head>
    <title>Getting Started with Django and Vite</title>
  </head>
  <body>
    <script src="{% static 'js/index-bundle.js' %}"></script>
  </body>
</html>
Note the js/index-bundle.js path, which matches the output format we defined in our vite.config.js file.
You can serve the the template by adding this to a urls.py file.
urlpatterns = [
  # other patterns here
  path('hello-vite/', TemplateView.as_view(template_name='hello_vite.html'))
]
This assumes hello_vite.html is available from your template loader.
You may also need to make sure you're properly serving files out of the static directory by adding the following to settings.py:
STATICFILES_DIRS = [
    BASE_DIR / "static",
]
./static directory can be found by Django's static files engine.Once you've gotten everything properly set up, head to http://localhost:8000/hello-vite/ and you should
see the very exciting "hello Vite" message from index.js.
Hooray! You now have a front-end pipeline embedded in your Django app!
Setting up hot module replacement (HMR) with django-vite for live-reloading in development
Ok so we have our JavaScript pipeline running!
This means we can use a modern JavaScript environment in combination with our Django templates.
But it's kind of annoying that we have to run npm run build every time we make a change in development.
It would be nicer if our site auto-reloaded any time something changed, like Django's runserver.
And it would be even nicer if that happened magically, without even having to reload our browser.
This is where hot module replacement or HMR comes in. HMR lets you "hot swap" your code out of the browser as it's running, letting updates you make in to the code reflect near-instantly in your browser.
How hot module replacement works with Vite and django-vite
Vite—in addition to being a bundler—is also a server. And Vite's server has HMR built into it. This gives us instant updates in the browser as we change our code. The only problem is that in order to use Vite's HMR, we need to be serving our assets from Vite's server.
This is where django-vite comes in. This incredibly useful little library helps us with two main things:
- It gives us a
{% vite_asset %}template tag to load our JavaScript files. - It provides a helper
{% vite_hmr_client %}template tag we can use to enable HMR.
The internals of how these work aren't super important.
You can think of {% vite_asset <filename> %} as a script that looks something like this:
{% if dev_mode %}
  {% load_from_vite_dev_server <filename> %}
{% else %}
  {% static <built_filename> %}
{% endif %}
Basically—if we're in dev mode, serve the file from Vite, otherwise, use the built version.
The details of {% vite_hmr_client %} are even less important, but you
can think of it as a magic incantation you put on your pages to let Vite's HMR work in development.
We'll just slap on our base template and move on.
Let's update our hello_vite.html template to use django-vite and add HMR.
We add the {% vite_hmr_client %} to our page head and replace
our static tag with the equivalent call to vite_asset.
{% load django_vite %}
<html>
  <head>
    <title>Getting Started with Django and Vite</title>
    {% vite_hmr_client %}
  </head>
  <body>
    {% vite_asset 'assets/index.js' %}
  </body>
</html>
hello_vite.html fileNote that we also now pass the source file reference (assets/index.js) instead of the built file reference
(js/index-bundle.js). This is because the vite_asset tag handles resolving the source reference for us
(via a generated manifest.json file).
django-vite,
which we can do according to the project README.
This is essentially installing the library with pip or uv, and adding it to your settings.INSTALLED_APPS.
As a final step, we need to actually run our Vite server. Let's add another npm command to our package.json for that:
  "scripts": {
    (other stuff here)
    "dev": "vite",
    "build": "vite build"
  },
package.json.Now we can run our Vite server with:
npm run dev
And those files will be served up directly inside our Django app!
Now that we have HMR hooked up, we can edit to our index.js file and see the changes reflected instantly in Django.
Win!
Working with external JavaScript libraries using NPM
Ok, we're finally all set up to start doing modern front end stuff. Thus far we haven't actually done anything useful—just made a silly auto-refreshing "hello world" example. Let's start exploring some of the benefits of having this front-end pipeline in place.
The first thing we might want to do is use a JavaScript library.
Let's try using the lodash utility library in our index.js file.
To do this we'll first install it via npm:
npm install lodash
When installing a package that will be bundled into your production bundle, you should use npm install.
If you're installing a package for development purposes (e.g. a linter, testing libraries, or—in the case earlier above with vite—a
bundler) then you should use npm install --save-dev or npm install -D.
This will determine where in your package.json file the library ends up,
and tooling will often remove development dependencies from final production builds.
This distinction isn't critical, but doesn't hurt, and is used throughout this guide.
Now we can update our index.js file to use lodash to generate our element:
import _ from 'lodash';

function component() {
  const element = document.createElement('div');
  element.innerHTML =  _.join(['Hello', 'lodash'], ' ');
  return element;
}
document.body.appendChild(component());
index.js file to use the lodash library.
Because we have HMR set up, as long as we are running Vite with npm run dev we should immediately
see "Hello lodash" instead of "Hello webpack".
And we can now work with external JavaScript libraries! You can repeat this process for any other library you want to use in your project.
One nice thing our Vite pipeline does automatically is tree shaking. This essentially means "removing code we aren't using." In practice that means that lodash—and any other dependent libraries—will only be included in our final bundles if they are needed. As an exercise, you can try removing the lodash dependency from the above file, and seeing how the size of the exported bundle files change!
Setting up React
Ok, so far so good. But we're still not doing anything really advanced—we're still basically using vanilla JavaScript and have just moved a few things around.
So now let's get fancy. Let's finally get a React app integrated into our project.
As we so lovingly alluded to in the introduction of this guide—React uses a language called JSX for its templating.
JSX is a language designed to let you easily use HTML in JavaScript code.
It's mostly like HTML but slightly different and more opinionated in ways that can be confusing
and frustrating when you first get started (for example, changing class to className everywhere).
Oh and it also lets you inject JavaScript into it.

Anyway, the details of JSX aren't so important.
The important part is that browsers don't know how to speak JSX. So in order to use JSX in development you have to compile it into something that browsers understand. This is where our JavaScript toolchain becomes critical—we can't use JSX in Django without it!
One of the best things about Vite is that it includes plugins with support for common libraries like React out of the box. Let's see how this works by adding the React plugin to our site.
First we need to install it as a development dependency:
npm install -D @vitejs/plugin-react
Next we add it to our vite.config.js file, by importing it:
import react from '@vitejs/plugin-react';
And creating a new plugins section:
export default defineConfig({
  plugins: [react()],
  // existing setup here
});
...And that's it! This will give our environment everything it needs to work with JSX. Now we're ready to test it with a simple React "hello world" application.
We'll start on the JavaScript side. First we need to install React and ReactDOM:
npm install react react-dom
Then we'll create a new hello.jsx file as a React version of hello world:
.jsx extension automatically tells Vite to load our JSX parser, so we can use
JSX syntax in our code.
import { createRoot } from 'react-dom/client';

const root = createRoot(document.getElementById('root'));
root.render(<h1>Hello, React!</h1>);
Note that instead of creating a new element, we are rendering our app onto an existing element
(with id="root"). We'll add this to our Django template in a moment.
We also have to add a new entry point to our vite.config.js file:
rollupOptions: {
  input: {
    'index': path.resolve(__dirname, './assets/index.js'),
    'hello': path.resolve(__dirname, './assets/hello.jsx'),  // add this line
  },
And finally, we have to update the Django template to match our new setup.
This means adding a new <div> with an id of "root" to our Django template for React to render in,
and updating the reference in the vite_asset tag.
Here's the file with those changes (both inside the <body> tag):
{% load django_vite %}
<html>
  <head>
    <title>Getting Started with Django and Vite</title>
    {% vite_hmr_client %}
  </head>
  <body>
    <div id="root" />
    {% vite_asset 'assets/hello.jsx' %}
  </body>
</html>
And we're done! If HMR magic hasn't refreshed the page automatically, do it yourself, and you should see:
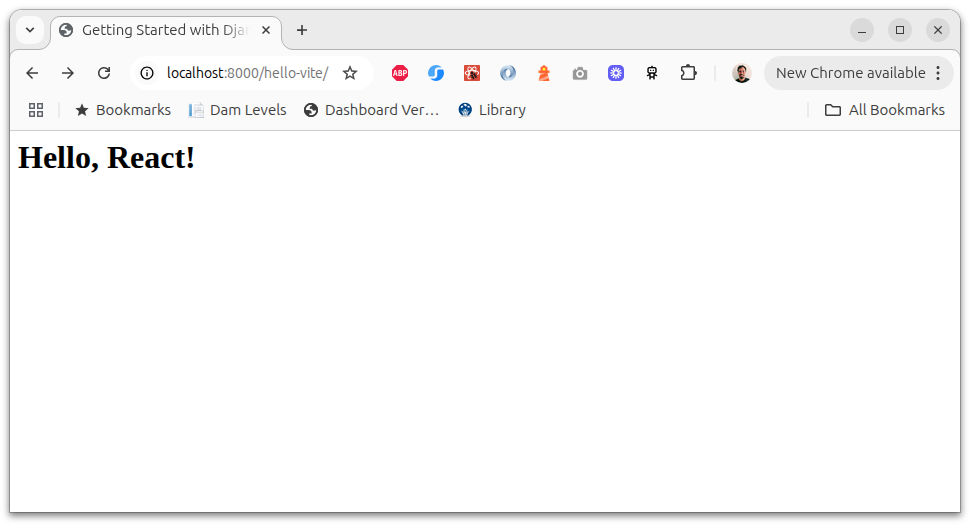
Congratulations, you've made a hybrid Django-React application!
Adding Tailwind CSS
Alright, we've got React. But our "Hello World" page still looks like crap. So let's style it!
These days Tailwind CSS is far and away the most popular CSS framework out there, so we'll use it for our site.
Now, Tailwind is a utility framework. This means that instead of using classes that define your components—things like "btn" and "nav-item"—it uses many little utility classes to achieve the same thing. So, for example, for a button you might write something like this:
<button class="px-4 py-2 rounded-lg font-semibold text-white bg-blue-600 hover:bg-blue-700 cursor-pointer">
  Click me
</button>
Resulting in this component:
People online have fierce disagreements about whether this is a good or a bad way to write styles, and this guide won't join in that flamewar. What is relevant is that due to the utility-based nature of Tailwind, it needs quite a lot of classes. And most projects only use a tiny fraction of those classes.

To avoid including a bunch of CSS that your project doesn't need, Tailwind uses tools that automatically inspect your HTML and JavaScript files and only include the classes it needs. And the easiest way to make use of these tools is—you guessed it—a front end pipeline.
So let's add Tailwind to our project! We'll start with the installation steps for Vite they provide.
Like React, we first need to install the plugin to configure Vite. We'll do that again as a dev dependency:
npm install -D @tailwindcss/vite
Then we'll add the plugin to our vite.config.js file by importing it:
import tailwindcss from '@tailwindcss/vite'
And adding the plugin:
export default defineConfig({
  plugins: [react(), tailwindcss()],  // add it to this list
  // existing setup here
});
Then we have to install tailwind itself:
npm install tailwindcss
And create a base CSS file for our site. Create assets/style.css and add the tailwind import:
@import 'tailwindcss';
Then add another asset path for it to vite.config.js,
and some logic to put css files in a different subdirectory of our static folder:
rollupOptions: {
  input: {
    'index': path.resolve(__dirname, './assets/index.js'),
    'hello': path.resolve(__dirname, './assets/hello.jsx'),
    'style': path.resolve(__dirname, './assets/style.css'),  // add this line
  },
  output: {
    entryFileNames: `js/[name]-bundle.js`,
    assetFileNames: `css/[name].css`, // and this one
  },
  ...
},
Finally, we need to add the vite_asset tag for our new CSS file to our Django template:
<head>
  ...
  {% vite_asset 'assets/style.css' %}
</head>
Let's try adding some tailwind markup to our files and see if it works.
First we can try it in React:
import { createRoot } from 'react-dom/client';

const root = createRoot(document.getElementById('root'));
root.render(<h1 className="text-center text-3xl text-indigo-200 font-bold">Hello, React!</h1>);
And in our Django template:
{% load django_vite %}
<html>
  <head>
    <title>Getting Started with Django and Vite</title>
    {% vite_hmr_client %}
    {% vite_asset 'assets/style.css' %}
  </head>
  <body class="bg-emerald-700 my-4">
    <div id="root"></div>
    <p class="text-center text-white">(and Tailwind)</p>
    {% vite_asset 'assets/hello.jsx' %}
  </body>
</html>
And it works!
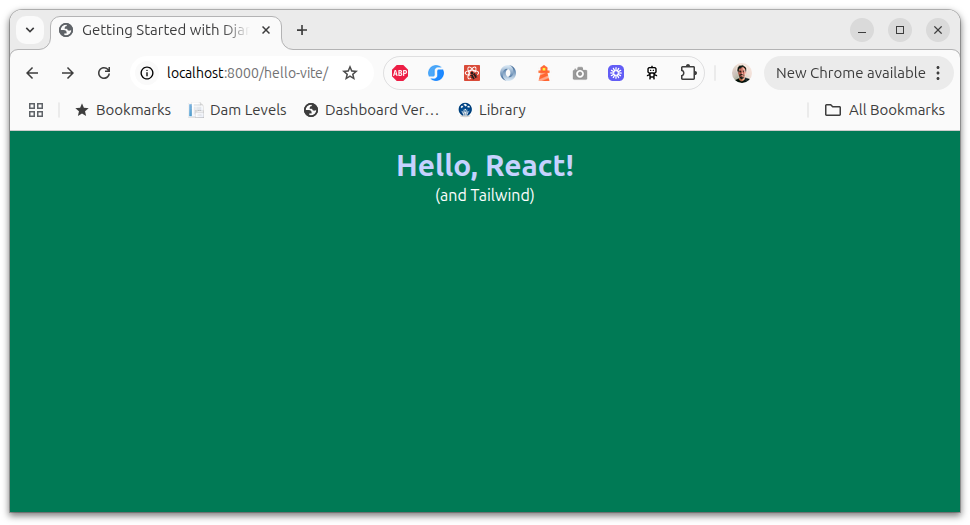
We can now use Tailwind CSS anywhere in our application!
What's next?
We're done with tooling! However, this isn't the end of the guide.
What comes next is the fun part: we can finally get coding!
In Part 4 we're going to use practical examples to start building out real applications in our new architecture. We'll cover things like interacting with APIs, passing information between the back end and front end, creating reusable libraries, and more.
Read on in Part 4: How to build a React application in a Django project.